What did you do this week?
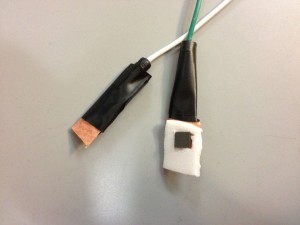
This week, the button was made. Figure below shows how we put the QTC sensor between the copper taffeta . It’s just a prototype. It’s not really neat but it works at least for these coming 2 weeks.

After that I tested the QTC sensor and (another flexible pressure sensor) with UNO. It worked :). I could turn the LED on/off . (Shown in the video below)
[http://www.youtube.com/watch?v=8B2CqgdbpUw&feature=youtu.be]
[]
We tested the bluetooth and confirmed that data can be transferred over the connection. We are still working to figure out how we can send the text message from the smart phone.
Describe the problems you encountered
I couldn’t find the Android-based smart phone to play with it during holiday. It’s not a big deal. I wrote a chuck of code. I’ll test it soon.
Describe the successes you had
Finally we could make the button from the QTC.
Thanks to the generous donation of copper taffeta from Nathan, We used it as a conductive material to ‘sandwich’ wires to each side of the QTC material. It’s successful, this’ll be a very resilient sensor for pressure that we can put on the fingertips or along the sides of the gloves for user interaction.
We also had success transmitting data from a bluetooth-enabled phone to the bluetooth module and having the Arduino respond to the data. We will use this success to move onto sending textual data and displaying it on the screen next!
Are you on schedule?
Yes! We’re past our initial hurdle of communication and we hope that integration of sensors will go much more smoothly. Hopefully!! 🙂
What do you plan to do next week?
For next week, we plan to integrate the flex sensors and build a test program for the android phone to transmit custom data (e.g. text messages) to the lilypad/screen.
