Week 2 – progress report

  • What did you do this week? [Include image(s)]
  1. Got all the material
  2. tested the screen
  3. tested the android toolkit and paired it up with arduino BT.
  4. tested the QTC material (res: 25 ohm – 1.5K ohm)
  • Describe the problems you encountered
  1. still we have a little problem for sending command from android to arduino
  • Describe the successes you had
  1. Android toolkit installed successfully
  2. Screen
  • Are you on schedule?
  1. sort of, we kind of jump to the second milestone 
  • What do you plan to do next week?
  1. will embed the QTC inside the PDMS
  2. working/coding for both android and arduino part
  3. starting to embed the LEDs inside the gloves


Week 2

talked to Kevin about how to hook up my EL wire to the Arduino to allow for multiple strands of EL wire to be hooked up.

played around with style lines on the dress form to see how far three meters would get me.  What you see is three meters, so I will need at lease 6 more meters to get the look I was going for.

this is what the style lines look like under fabric.  I’m just playing around with different look.

where all the hardware will be hidden.

Successes:

got the EL wire to light up and played around with a couple of style lines

Problems:

Realizing that there will be more bulk than I was hoping for in the back of the dress but hopefully that will be covered by the fullness in the train.

Schedule:

I am behind schedule, but hopefully I can pick things up in this coming week.


moving forward:

-keep patterning

-figure out how much EL wire I will need.

-Figure out how I will make the lights flash to the beat of music using a sound sensor.


Project Update Posting Structure

For the weekly update posts, please address the following questions:

  • What did you do this week? [Include image(s)]
  • Describe the problems you encountered
  • Describe the successes you had
  • Are you on schedule?
  • What do you plan to do next week?

Week 1 progress

This week was a struggle but I got some stuff done.

I have ordered my accelerometer and colored LEDs

i have extensively narrowed fabric choices down from swatches i have

Nathan and Kevin have helped me make my project more ambitious with the use of 4 or 6 magnet terminals as a way to effectively “waterproof” my unit, but allow it to communicate and charge with the outside world.

Most importantly, today I had a nice swim for research and collected a sample of genuine SERF pool water.

Goal for this next week is to post the weekly update on time.

-Zach

EL Dress

Description:

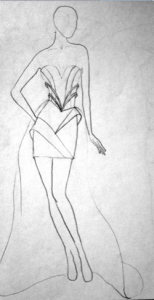
Fitted structured dress with a long train.  EL wire is used to outline the silhouette and emphasizing two different style lines as well as illuminate inserts from underneath.  There will be two different style lines that will be illuminated at different times.  This dress is meant to be seen in a fashion show or installation atmosphere

Inspiration:

Fast and Furious cars are my main inspiration.  The sleek lines of the car are mimicked in the outlining of the style lines and the silhouette.  Fast and Furious cars are illuminated from underneath, which will be mimicked in the inserts.

Plan:

-Pattern
-Sew dress
-Couch EL wire onto dress on both inside and outside. (there will be a lining)
-Power it through battery pack under train in back of the dress
-Program EL wire with the arduino to turn different style lines on and off.
      –There will be two different sets of style lines
Back up Plan:
        If all else fails, I will only illuminate one set of style lines.
Calendar:
-Week one
      -Patterning
      -Play with el wire and figure out how much I will need
-Week two
       -Start sewing and ordering el wire
-Week three
       -Continue sewing and start couching on el wire
-Week four
       -Finish couching on el wire  and start programing
-Week five-eight
       -Finish programing and start making sure everything is working
       -Make sure that lights stay on for a long time

Moneo: Day 4

Gallery

This gallery contains 5 photos.

Did a lot of reading about connecting SD flash card to an Arduino Got the first box of parts from SparkFun See all the unpacking photos below:  

Glove as an interface – Week 1 – progress report

We got the gloves. (Thanks Jessica)


We ordered these parts:

– Bluetooth Mate Silver $39.95
– QTC $14 (Thanks Nathan)
– Serial Enabled 16×2 LCD – White on Black 5V (for testing purpose)$24.95
– wires $5
– Battery $1.5

– All the materials are estimated to be arrived by Wed Nov 6th.
– We will test our code on UNO for this week.
– We have to fugue out something for flexible screen/LED
– We will put the sensors and wires inside the glove liners.
– Next week we will work on the signaling part (with QTC)

Cheers,

hydro arm shiver

Description

This forearm band is to measure physical activity while swimming laps.  LEDs are turned on and accumulated as the workout goes longer.

Inspiration

The Nike Fuelband is the main inspiration for the project, except since that product is not waterproof, that is where this project takes over.

Project Materials and Cost

fabric – $15

accelerometer – $15

lilypad – $60

waterproofing resin – $20

waterproof USB – $15

Steps/Timeline

  • acquire materials
  • convert Nike Fuel points to water activity
  • test waterproofing methods for circuitry
  • code with accelerometer
  • test motion capture with swimming motions
  • construct arm band
  • prepare materials, like a fish tank, for presentation

Backup Plan

Put entire electronic housing in waterproof pouch if resin system fails.