Light up Scarf

Description:

A scarf that functions as your typical scarf would with the addition of a light up component for safety after dusk.

Inspiration:

Hani Rashid:

Architect that creates luminous buildings focusing mostly on organic shapes.

Materials and Costs:

Yarn: $30 dollars
Lily Tiny: $75 dollars

Steps/Timeline:

Nov 9: Loom in process of being threaded
Nov 13: Scarf will be completely woven
Nov 15: Begin application of LilyTiny’s
Nov 22: Begin coding process for alternating pattern on scarf
Nov 29: Perform final touches for the coding side
Nov 30: Have scarf finished

Back Up Plan:

Sew less LilyTiny’s on, if there is not enough power to turn them all on.

Robe a la Foudre

Statement of Purpose:

The intended outcome for this project is to create an 18th century-style gown that is designed to look like a lightning storm.  Lighting and electronics will be incorporated in a more subtle and comprehensive manner in order to surprise the viewer with the full function of the piece.  I would also like to incorporate a performance aspect, where the intensity of the “storm” is influenced by the gestures and movement of the wearer.

Project Materials:

  • Wool felt
  • Ultra bright white LEDs
  • Arduino
  • Conductive thread or ribbon
  • Accelerometers
  • Lithium ion batteries

Project Steps:

Garment

  • Pattern gown
  • Dye wool roving
  • Make felted panels
  • Assemble gown
  • Insert electronics

Electronics

  • Write “lightning” simulator program
  • Plan wiring/lighting schematics
  • Determine power needs
  • Assemble lighting arrays

Concepts to Master:

  • Wool dyeing
  • Wet felting
  • Randomization programming
  • Use of accelerometer data
  • Programming and powering large quantities of LEDs via Arduino
  • Efficient and effective wiring schemes

Proposed Calendar:

Week 1

  • Begin patterning gown
  • Order wool & dye
  • Begin work on “lightning” program

Week 2

  • Finish patterning gown
  • Continue work on “lightning” program

Week 3

  • Dye wool
  • Continue work on “lightning” program
  • Order electronic components

Week 4

  • Begin felting
  • Start working with accelerometers

Week 5

  • Finish felting
  • Complete Arduino programming

Weeks 6-8

  • Sew gown
  • Assemble and test electronics
  • Insert electronics into gown


Smart Jacket

Description:

  • A jacket equipped with lighting elements for increased visibility at night.
  • It will also warn the wearer of activity close behind them such as another runner, biker, or car.
  • The jacket will also collect and display biometric data.

Inspiration – Combining elements for some of the following existing products:

  • Reflective gear
  • Nike Flash (reflective glass beaded material)
  • Nike Fuel Band
  • Heart Rate Monitor

Materials and Costs

  • Fabric: $60
  • LEDs: $10
  • LED string lights: $20
  • Pulse Sensor: $25
  • Proximity Sensor: $28
  • Accelerometer: $15

Concept Art

Steps/Timeline

  • Construct Jacket – Finish by Nov. 25
  • Circuit lighting elements – Finish by Nov. 18
  • Add proximity sensor – Finish by Nov. 25
  • Add heart rate monitor – Finish by Dec. 2
  • Add accelerator – Finish by Dec. 9

Backup Plan

  • Decrease the amount of features incorporated in the jacket
  • Add features to an existing jacket

Glove as an interface

Title: Interface Glove (Alper + Mehdi)

Description: Mehdi and I are planning on making the glove an interface to information stored in the pocket (where the cell phone usually resides!).  This helps keep attention on the surroundings instead of focused on an information device.  We anticipate that giving just the minimal amount of necessary information will minimize longer distractions of fiddling with a cell phone.

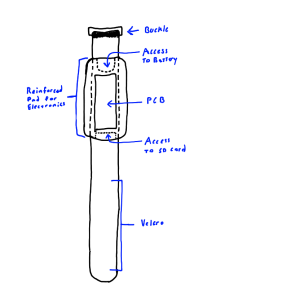
Inspiration: Signal gloves and new watches are two ways of communicating with the outside world.  With a interface in the glove, we can easily communicate and acknowledge communication without taking out another device out of the pocket.  All the electronics are embedded on a glove, which is already worn in cold weather.

Materials/Costs:

– Gloves (free/$10)
– LEDs ($5)
– Flex sensors (to sense bent fingers, $10)
– BT ($15-25)
– OLED screen ($40-60)
– Battery ($10)

Concept Art: We anticipate a glove design that utilizes a screen and bluetooth to interface to the cell phone and display pertinent information, such as the subject of a recently-arrived e-mail or text message.  Auto-respond buttons could let the user acknowledge a communication without having to take out the phone and compose the message manually.

Schedule/Timeline: 

– 11/1 – Acquire materials
– 11/15 – Finish signaling glove (first milestone)
– 11/30 – Investigate screen/bluetooth sensor integration (2nd milestone)
– 12/5 – Develop android app  (last milestone)
– 12/13 – Presentation

Backup plan: Work on getting the simple signal glove working first, with different sensors (flex, contact, light) to sense the conformation of the hand.


“Moneo” – Project Design Proposal

“Moneo”

It’s not what you know,
But who you know…
… Yet, how to remember them all?
———————————————————————–

  • The Business Card: A classic method for exchanging contact information
  • The Handshake: A classic method of professional greeting

Can we combine these two iconic symbols of professionalism?

———————————————————————–

Introducing the Moneo

  • Acts as an electronic business card
  • Can transfer contact information to other Moneos upon shaking hands
  • Can store many contacts – No risk of losing that stack of cards!
  • Suitable for large events where you meet many new people
  • Everything is contained in a low-profile wrist strap

———————————————————————–

Evolution of the Moneo

  • Initially started as a glove device, and then a half glove, but these ideas were scrapped due to concerns of bulkiness.
  • Eventually settled on a wrist strap both for its simplicity and that many conferences already use wrist straps as I.D.
  • Initial idea was to use NFC, Near Field Communication, but this technology is complicated to use and there were serious range concerns.
  • 2.4 GHz radios were eventually picked for communication due to the ease of use and cost.
Moneo Design Diagram

Moneo: Showing general layout and parts.

———————————————————————–

Bill of Materials

  • Nylon Wrist Strap : $10
  • Microcontroller : $20
  • RF Transceiver : $2
  • Accelerometer : $15
  • MicroSD Socket : $5
  • Battery : $7
  • Miscellaneous Parts & Tools : $150

Estimated Mass Production Cost

~ $15 at Qtys >10,000

———————————————————————–

Production Process

  • Order and Assemble Prototype Components
  • Determine Circuit for Transmission Range
  • Design a PCB (TBD)
  • Assemble Final PCB(s) and Sew to Strap(s)

———————————————————————–

Skills Required

  •  RF Circuit Design
  •  PCB Design and Assembly (TBD)

———————————————————————–

Production Schedule

  • Oct 28: Order Prototype Parts
  • Nov 11: Assemble Prototype, Design PCB
  • Nov 18: Order PCB, Software Development
  • Dec 2: Assemble PCB, Assemble Strap
  • Dec 9: Final Testing and Tweaking

—————————————————-——————-

Fallback Plans

Major Risk: PCB Production Time

  • Worst Case: Sew Prototype Parts to Strap
  • Alternative: Replace PCB

Risk: RF Circuit Design

  •  Worst Case: Fallback to Physical Contacts
  •  Alternative: Use IR, Sound, Induction, etc…

Final Project Presentations!

For Friday, please prepare a 5-minute (or more!) presentation on your final project. This should be in powerpoint, keynote, or similar format. Use a flash drive, dropbox, or laptop to present.

* 5-10 slides
* Include inspiration images/artists/designers/projects that are relevant to your idea.
* Include digital or scanned sketches of your project- if your design alters as part of the goal, please show the change concepts.
* Include a bulleted list of the steps of your process
* Include a bulleted list of the materials/tools you’ll use/need (this is a great way to find out if your classmates have resources you can tap into)
* Include a blurb on hypothetical/ideal production costs and quantities (if this is intended as a unique piece, please discuss where you see your piece fitting into the design world- i.e. couture, designer, off the rack, runway, art, performance, etc.)
* a list of ideas/concepts that you will need to master for completion.
* Include a fallback plan- what can you do to recover your project if it doesn’t go as planned?
* Include a loose calendar or schedule of when you’d like to be where in the process.

BRING THE ENERGY!


Project Pitch

Present a roughly 5 minute concept that explores your idea for final project.  This is meant to be more of a brainstorming session to think through possibilities for final projects. We will have a more formal project pitch in a few weeks when groups and and projects are decided.

Items that you should include in your presentation:

  • A description of the what you would like to do
  • A description of materials you intend to use
  • A description of what an ideal result would be
  • A list of what you know how to do
  • A list of what you think you know how to do
  • A list of thing you don’t know how to do


Use images/video of inspiration concepts and/or sketches of your own to illustrate your idea, if you can.

If you hope to work in a group, prepare a recruiting pitch.

If you have more than one idea, bring them all. Some ideas may be more developed than others. We can brainstorm in class to help you arrive at one you’d like to pursue.