Jewel Heist: A Hololens Experiment
Jamie Artin, Sara Bonefas, Brandee Easter, and Sunny Shah
MOTIVATION
The core goal of our project is to explore the affordances of the Hololens and the possibilities of mixed reality through the creation of an “escape the room” game.

We began this project with a different goal and concept: creating the experience of synesthesia. However, in developing this idea, we realized that we were most interested in the affordances of the Hololens. We were particularly interested in what we could do in mixed reality. We were inspired by this October 2015 Hololens demo of Project X-Ray and how it transformed a simple room — with two walls and a couch — into an exciting game space. This new focus drew us to asking how we could create an engaging experience in an otherwise ordinary classroom or office space in WID. Instead of ignoring physical reality, how could we transform it?
 This is what led us to try to make an escape the room game. We believe that this popular game genre gives us the ability to put an exciting puzzle within the everyday physical space the user already occupies. In fact, many of these games are set in ordinary looking rooms and require the user to uncover the extraordinary hidden amongst everyday items. This makes it an ideal game genre to explore in mixed reality, allowing us to build on instead of blocking out, the physical world. We further decided to twist this genre — giving it an added heist plot element — to help give the player the story and purpose, which
is sometimes missing from other escape the room games. Advice on the role of story from research on Disney’s Aladdin was helpful for this development [1]. One key to setting this scene and story for the player would be the use of a laser security system for the first puzzle, requiring players to  stealthily navigate the room to disarm the system before moving on to other clues of the game. Ultimately, our goal was to create a fun experience that embraces an everyday space, instead of rejecting it.
CONTRIBUTIONS
Jamie Artin – Developer
- Researched and developed spatial mapping
- Created prototype in Unity
- Aligned object placement with horizontal and vertical surfaces and debugging/fixing related issues
- Added structure prefabs in Unity so that they can be identified and placed appropriately within our map by the placement script
- Tested Unity’s rotation and position values to create correct appearance in the Hololens
- Researched Microsoft’s tutorial scripts for inclusion in our project
Sara Bonefas – Designer/UI Specialist
- Assisted with storyboarding
- Tested Unity’s rotation and position values to create correct appearance in the Hololens
- Researched and attempted to implement gaze and gestures
- Researched concept and compiled Unity assets
- Developed lasers from Unity’s particle system
Brandee Easter – Project Manager
- Scheduled meetings, set project timelines, created agendas, and documented process
- Assisted with storyboarding and testing
- Wrote and posted weekly group updates
- Drafted final post
- Managed and created presentation deliverables
- Researched content and compiled Unity assets
- Attempted to implement gestures
Sunny Shah – Developer
- Researched and developed spatial mapping
- Set up development environment and the Hololens emulator
- Aligned object placement with horizontal and vertical surfaces and debugging/fixing related issues
- Added structure prefabs in Unity so that they can be identified and placed appropriately within our map by the placement script
- Tested Unity’s rotation and position values to create correct appearance in the Hololens
- Researched Microsoft’s tutorial scripts for inclusion in our project
OUTCOMES
Describe the operation of your final project. What does it do and how does it work?
Our main outcome was supposed to be the actual game. However, due to the challenges we faced during the course of the project and the time constraints, we changed our focus to discovering and troubleshooting a number of challenges that still face developers working with the Hololens while also trying to implement as much of the game as possible. Although Microsoft (and others) present Hololens development as accessible, our attempts to create our game proved otherwise. Because of the challenges developing with the Hololens, we were unable to execute our project as designed. Instead, we have completed a Unity build that shows what the final scene would have looked like. Because we were looking to create a mixed reality in a classroom or office setting, we chose assets — such as desks, file cabinets, etc — that would make sense in our room. We wanted the game to have the feel of the everyday, very much in the vein of other games in this genre.
We began by storyboarding our idea out on whiteboards. This  helped us determine which assets we would need and design clues, keys, and procedures for escaping the room. Our original design begins with the player in a room that is armed with a laser sensor and an on-screen message giving players their mission — to find, steal, and escape with the valuable jewels. With this heist theme, we aim to give players the purpose and story to make sense of the room and their necessary actions in it. We also hope that drawing on an otherwise popular virtual and physical game genre will help players easily interact with our world.
By starting the player in a room full of lasers inhibiting their movement, we aim to instantly place the user into playing their role and signal the need to navigate the room differently than they would have in their physical reality. After finding the disarm switch to shut off the lasers, the player then has to use clues, such as codes hidden in whiteboard messages, to unlock drawers, find keys, and open the safe behind a painting. After opening the safe, the player will add the jewels to their inventory and use the final combination to unlock the door, reaching a win state that is acknowledged with an on-screen message.
Our Unity build and storyboarding show this original design. We believe this is a unique and exciting concept because it transforms, instead of ignores, an everyday space. This, to us, seems to be the core affordance of the Hololens over other VR systems. The Hololens does not remove the user from their space but adds to it.
VIDEO: Unity build
An additional outcome of this project was that we troubleshot many setup, mapping, and placement issues with the Hololens. In later sections, we offer a discussion of the challenges we faced in trying to implement with the Hololens so that others might benefit from our work. We believe that our experiments, especially in spatial mapping and object placement, could be helpful for future class members working with the Hololens.
How well did your project meet your original project description and goals?
The only aspect of our project that is true to our original proposal on synesthesia is that it is focused on exploring mixed reality. However, all of our adjustments have been in pursuit of this core goal: to explore what the Hololens can do. In fact, we believe that our adjustments allowed us to do a better job of reaching this goal. Because of the classroom or office setting — where our game would necessarily be played for this course — we felt that opportunities for interesting stories about synesthesia were limited.
Thus, although we did not reach the original project description, we remained focused on our goal, and we believe that we have tested and tried out the affordances of developing with the Hololens. Because of the challenges we faced, we believe that this goal-oriented focus is a strength, showing our adaptability and problem solving skills. This can be seen in the ways we began all of our group meetings. Instead of working independently on disparate parts of the project, we started every meeting with an agenda — setting goals for the day as well as discussing the project timeline and making adjustments in light of recent challenges.
What are your collective feelings about the project? Happy, content, frustrated, etc?
Overall, we leave this project feeling frustrated, though satisfied that exploring the Hololens was an interesting problem to tackle. It was a good experience in learning something new. We have discussed whether or not we would select the Hololens if we could go back to the beginning of this project and start over, and we are split on whether or not we would make the same decision. Although some of us felt like it would be more satisfying to leave with a more finished project, we are all much more interested in developing for mixed reality. Ultimately, the opportunity to think about mixed reality and learn related concepts and techniques outweighs the frustration for us.
PROBLEMS ENCOUNTERED
We encountered problems at almost every step of this process. In this section, we detail them and our solutions (when possible) to overcoming them. Finally, we provide some general advice for future developers.
INITIAL SETUP
The first challenge we encountered was the initial Hololens setup. This involved things like connecting to wifi, pairing the device with our development machine, and having a launched application remain running in the Hololens.
- Connecting to wifi: This was a challenge due to the Hololens resetting the connection to a different network than the one we selected. Since this was our first use of the device, we could not figure out what was going wrong. We eventually performed a restart of the device after which everything worked fine. Once this was done, we created a simple application (a Unity scene displaying a man standing on the floor) to launch on the Hololens and tried deploying it. This presented the following two problems.
- Device pairing: When launching the application from Visual Studio, we were prompted for a “pin” before a connection to the device could be established. It was totally unclear what this pin was or where it could be found and also was not mentioned clearly on the Microsoft tutorial pages. We figured this out ourselves after some time and could pair the device successfully.
- Running an application in the Hololens: For the initial tries of launching the simple application, it would launch successfully, but the man in the application would disappear after about five seconds from launching. We thought this would be a problem for our main project, so we spent some time researching to figure out the root cause. However, all our efforts were in vain since we could find no other information about the issue. We then moved on to the main project since we did not want to lose time, and luckily we didn’t face the same problem again.
We also tried to setup the emulator on another laptop so that we could work in parallel and increase productivity. However, the emulator on that machine did not behave consistently: it would either refuse to launch any application or if it did launch, only a black screen would be shown. It was also unresponsive to input at times. We decided to not rely on the emulator for the rest of the project.
 SPATIAL MAPPING
Spatial mapping was one of the most time consuming challenges of our project. It was very difficult to get an accurate mapping of our room, although we tried several times and even attempted a factory reset on the device. However, we struggled to get even the most basic of surfaces, such as floors and walls, accurately mapped.
To get started, we completed Microsoft’s tutorial on spatial mapping. From this, we learned how to scan the room and import that map into Unity for development. In the top image, you can see an aerial view of the spatial map we created in the WID. Although the device has recognized the four walls of the room, which are indicated by the horizontal blue lines in the images, it has also generated additional walls, jutting out at an angle from the outside of the room. The bottom image captures the unevenness of the 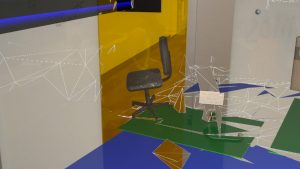 floor planes in our map. Not only is the mesh uneven, but in this instance, the device has registered the floor as a table, which can be seen in the green planes.
We believe that one of the biggest problems we faced with the spatial mapping was that another group was also working with the Hololens. Because of this, the map of the space was expanding and changing as others were using it, and although we had some early success with mapping, these changes created more problems. One of these was that as the map expanded, our objects became more disparately placed across them, which even made troubleshooting and testing more difficult because it created the need for us to wonder through the ever-growing mapped space searching for objects.
We attempted to calibrate the Hololens and update the sensors, but this did not solve our  problems. We also attempted a factory reset, and we were able to create a new spatial mapping of a smaller area in our workspace. With this spatial mapping, we were hoping to create a more complete map. The new spatial mapping was more accurate compared to before, but did solve the problem we already had with object placement. In this image, you can see that the new mapping was able to recognize the floor with the light blue plane.
OBJECT PLACEMENT
In addition to our inability to get a  clean, accurate map of the room figuring out the relationship between placement in Unity and appearance in the Hololens was the second biggest challenge we faced. Objects are easy to place in Unity but much more difficult in the Hololens. Even though an object will appear in the proper place when “played” in Unity, that has not translated to results when the app is launched in the Hololens. Objects have appeared unexpectedly rotated or even entirely missing from the room. To troubleshoot this, we have used trial and error in Unity, building and launching from Visual Studio, and scanning the resultant environment to understand what was wrong.
A great challenge to this debugging is that between any two launches of our app, the same objects with the same properties in Unity might show up with different rotations, in different places, or not at all. We attempted to make sure that we were launching the app with the Hololens in the same position, but even this did not give us any consistency in object placement. Also, the code took a long time to launch from Visual Studio to the Hololens, which made the trial and error of object placement very time consuming.
We first tackled placing objects aligned with vertical surfaces within the map. After some trial and error, we were able to successfully place a picture on a wall. However, the picture was facing into the wall, so only the back of the picture could be seen. This required even more trial and error as we tried various rotations to get the picture facing into the room instead of into the wall. Instead of adding the asset directly to the scene in Unity and setting the rotation values on it, the solution was to create a new game object followed by adding the picture asset as a child of this game object and setting the rotation values on the child.
 Placing objects on the floor proved even more difficult. When we attempted to use the same tactics that allowed us to accurately place on walls, objects appeared in, instead of on, the floor. This can be seen in the image to the right, in which we have tried to place an asset on the floor. However, the object (in this case, gold coins) sits inside the floor. To fix this, we used gravity to get objects to stay on the floor instead of sinking in. Using this method, we were able to achieve placement with decent consistency.
One problem that was common to all placements (vertical or horizontal) was the distance of objects from the user in the Hololens. For two runs of an application where no changes have been made to the “position” attribute of an object in Unity in either run, the same object showed up at different distances from the user in both runs. This led to us not being able to find the object at all in certain cases, most likely because it was not within the spatial range of the Hololens. Additionally, because the Hololens measures distances in meters, one would expect that an object’s “position” attribute’s x, y, and z values would get translated to an equal distance in meters when launched in the Hololens. We tried this several times with different parameters but did not see the equivalence: the “position” attribute did not appear to have an effect on the object’s position in the Hololens which made placing an object at a fixed location a painful obstacle. We have not really been able to figure out why this is happening, but our general observation has been that if the application is launched in a room with just four walls and no partitioning structures within the room (for example, cubicles with partitions), the objects show up at reasonable distances from the user and do not end up outside the Hololens’ range.
Although we were able to achieve all of this, our uneven spatial mapping meant that objects continued to not behave properly. The gold coin image also nicely shows the troubles we had with the uneven mapping. The slanted floor planes here caused many issues. Most troubling, it caused objects to shake or move. We believe this has to do with the poor floor mapping’s effect on gravity. To fix this, we tried to freeze the rotation, but the objects did not keep still. Instead, it localized the shaking in one of the x, y or z axes.
VIDEOS: See the following videos for more on how objects reacted to this mapping
- Desk placement (shaking)
- Box placement (spinning)
- Chair placement (incorrect rotation)
GAZE AND GESTURES
Because of the problems we faced (as well as the time required to work on mapping and object placement), we were unable to implement gaze and gestures into our design. Though we researched ways gaze and gestures could be implemented, we were only able to implement part of the Microsoft Hololens Academy gaze tutorial. The most frustrating problem we encountered here was that the provided code from Microsoft’s tutorial was broken. When we attempted to build the project, we first received a compiler error. After investigating, we found that the errors were with Microsoft’s code (the Unity player namespace could not be found).
We attempted to debug first by commenting out the code that contained an error. Then, we tried to search Microsoft’s Hololens development forums, and although we found other discussions on bugs with the gaze tutorial specifically, none of these solutions worked for us or were about exactly the same error messages. Ultimately, we had to abandon this part of the project because of these code issues. Although we had other issues with this project, this experience showed how important those tutorials were for getting us started, even if we encountered lots of problems later. Without them, there was no start at all.
OVERALL ADVICE
As part of our experiment, we would like to offer some additional suggestions for future developers trying to work with the Hololens in this class.
- Hololens setup: Make sure that the computer being used to connect to the Hololens and the Hololens itself are on the same network. Also make sure that the Hololens is paired with your computer (using the pairing option in Hololens’ Settings). To avoid doing this more than once, always check to see that it is paired when you get started.
- Battery life: The Hololens battery drains very quickly. If possible, make sure that you leave it charging while you are gone so that you can begin with a full battery. It also helps to be aware of this in between testing so that you can be charging when you are working in Unity, searching for answers, etc.
- Coordinate systems: If the objects appear flipped or oriented in the wrong direction, make sure the game object’s coordinate system aligns with Unity’s coordinate system.
- Placing an object on the floor: Ideally, one would expect that using appropriate scripts to place an object on the floor would work fine. Quite often though, this does not work and objects may appear tilted or hovering in the air. In such cases, apply the “Rigid Body” component in Unity to the object so that it can “fall” to the floor in the mixed reality environment.
- Spatial mapping: For using a spatial map, make sure to get the mapping done correctly. When generating the spatial map from the device portal, look at all spots of the space to be mapped, especially spots that are partially hidden or covered. Also, look at the entire area of the ceiling and floor. As you look around, you can also do the “click” gesture in the room to see how the Hololens is mapping your surroundings. This will help ensure no part of the space being mapped is missing when the application using the map is launched.
- Game objects and prefabs: When adding a new asset using its prefab for an application in Unity, first create a new (empty) game object within Unity’s hierarchy and add the prefab as this game object’s child, as opposed to directly adding the prefab as a new object in the hierarchy. In addition, any Unity components applicable for the asset should be added to the gameobject itself. However, any changes to rotation/scale/position should be made to the child of the game object (the prefab).
- ‘Play’ in Unity vs the Hololens: Before launching an application in the Hololens, it is common to “play” the current scene in Unity in order to know what it’d look like when launched. However, it would be wise to be cautious about considering the played scene in Unity as being definitive of the final outcome. Our experience has shown that what is seen in the played scene in Unity is not the same as what appears in the Hololens. This is mainly due to the transformations that come into play to display virtual objects within the real world by virtue of the Hololens being a mixed reality device and not a virtual reality device.
- Clear/Glass Walls: Rooms with glass walls map through the wall because the glass is not seen as a wall. This will give your spatial mapping holes in the walls, or the Hololens may map what it finds behind the glass wall. For example, if there is a glass wall with a pillar behind it, the Hololens will map the pillar as a wall. This is good to keep in mind when trying to place objects on vertical surfaces.
- Field of view issues: The Hololens has a limited field of view that only allows the user to see a small rectangle of the holograms being displayed. Since the field of view is limited, the user is needs to actively look around in order to see all of the holograms. This is also good to keep in mind while developing a Hololens application, as the user may need to be directed as to which direction they need to look in order to find a hologram.
NEXT STEPS
If we had more time, we would work more with the new spatial mapping created after the Hololens reset. With this map, we were sure to scan every aspect of the room in order to get a complete mapping and hopefully minimize the jagged planes in the floor and ceiling and extra walls behind walls; however, there were still some issues with the object placement. If we were able to get an accurate and complete mapping, we may have been able to find a pattern between the object placement in Unity and the object placement in the Hololens. Also, if the floor was mapped well, we would have been able to successfully place objects on the walls and the floor, creating an opportunity to apply the game scene prototype we created to the spatial mapping.
If we had more time, we also would have been able to research even further to hopefully eventually find any other Hololens gaze tutorials and/or the fix to the compiler errors we occured with the Hololens Academy tutorial. With the gaze and gesture Academy tutorials complete, we would have been able to add gestural commands to our game, such as tapping to add an object to inventory, hitting the button to disarm the lasers, etc. This would have added another dimension to the game experience and opened more opportunities to enhance the game.
WORKS CITED
[1] Pausch, Randy, Jon Snoddy, Robert Taylor, Scott Watson, and Eric Haseltine. “Disney’s Aladdin: First Steps Toward Storytelling in Virtual Reality.” SIGGRAPH ‘96 Proceedings of the 23rd Annual Conference on Computer Graphics and Interactive Techniques. New York: (193-203).