Category Archives: Projects

Lights-up Dress Final Post

사진 1 (3)사진 2 (3)

Lights-up Dress


  • Describe what your project does and how it works

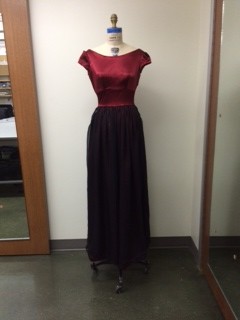
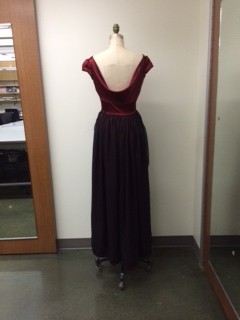
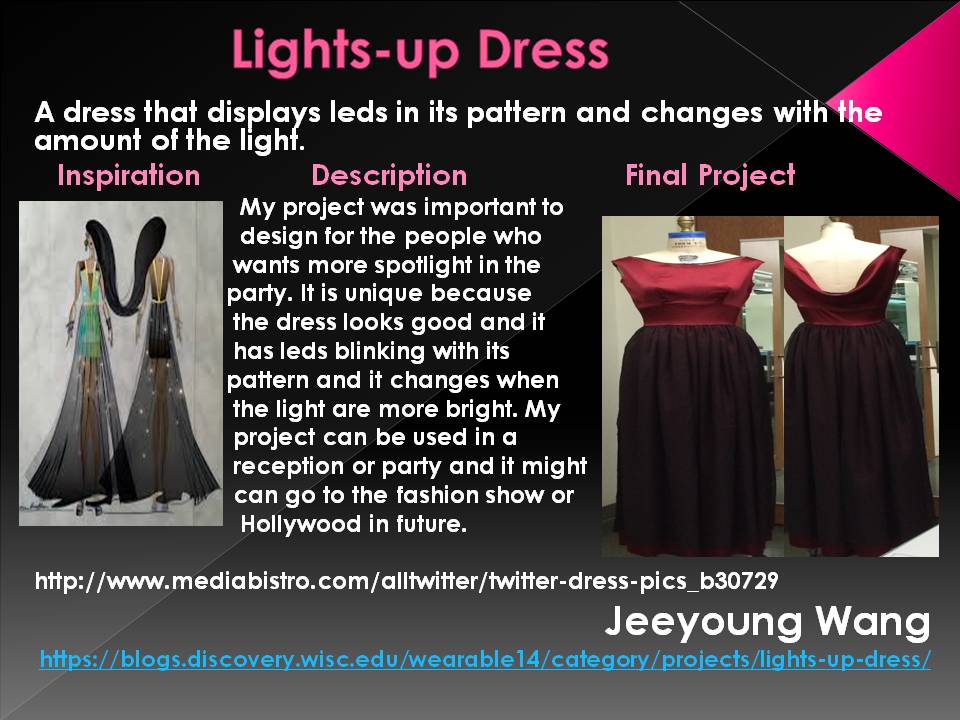
My project was Lights- up Dress and I design my project for people who want more spotlights in the party. Lights-up Dress displays leds in its pattern and changes with the amount of the light.  Dress was having leds hooked up to the shift registersand light sensor. First leds will blink by its order and when the light hits the light sensor, leds will start blinking faster.

  • What are your overall feelings on your project? Are you pleased, disappointed, etc.?

I am quite happy with my overall project  because this technology area was the first time that I entered and I cannot believe that I did this much of the technology work at first time. I know that there were many problems that I had and I need to learn more to proceed my project but, I am pleased with my project for now.

  •  How well did your project meet your original project description and goals?

My final dress did not meet my initial project very well. My original project was that leds will going to blinks by its order and patterns will change when person have a specific movements.  My original project needed the accelerometer but I was having many problems and I couldn’t figured out how to work with it ,so I changed my input to the light sensor which was my backup plan. However, the final project did met my original project goals which was the dress is for people who wants spotlight in the party.

  • What were the largest hurdles you encountered?  How did you overcome these challenges?

The largest hurdles I encountered were the programming the code and dealing with the accelerometer.  Programming the code needs the overall knowledge of the technology and engineering and I wasn’t the person who was familiar with technology and engineering because this was the first time that I had chance to learn about technology.  Therefore, programming the code was one of my hardest part throughout the semester. However, I asked help from Professor Kevin and TA Jess to figure out the programming and I think I overcame little bit of the programming the code. But, I think I need to study and research more to be more familiar with the programming to program new materials in the future. Another hardest part that I encountered was dealing with the accelerometer. It is because accelerometer did not give me the proper information when I was trying to programming the code and I wasn’t sure the accelerometer was working or not. So, I couldn’t overcome with this problem and I changed the input from the accelerometer to the light sensor which was my backup plan.

  •  If you had more time, what would you do next? 

If I had more time, I want to spend more time to sew leds, shift registers and light sensor carefully to my dress to not make a shorts and I want to add more leds to my dress. Also, I want to change my leds to neopixels because my leds took lots of the spots to sew. And I want to change the position of the light sensor to shoulder to catch more lights.

TEB Final Post


Final image

TEB Poster

Description of project?

TEB is a thermoelectric bracelet that induces a perceptual change in body temperature so it is essentially a personal air conditioner.  Research has shown that when you apply heat to a local part of your body such as the wrist or forehead, your brain perceives it as your overall body temperature changing.  An example of this would be placing a washcloth on your head during a hot summer day or running cold water over your wrist when you have a fever. The project harnesses this pyschological phenomenon and it works by sending pulsated thermal stimuli through the wrist using a micrcontroller for the pulse frequency automation and a thermoelectric cooler for providing the heat.  Now, there are six levels of heating and cooling so depending on how uncomfortable your environment, you can set the appropriate level using two push buttons and an LED bar for indication.

Overall feelings on your project?

I am quite pleased with how this project turned out given the short timeline we had and the problems I ran into. I felt I was able to quickly and effectively solve those problems where I was able to get a working prototype done by our showcase event. However, I feel there is much more to the project than what I produced with the first prototype so I plan to continue my work into next year.

 How well did your project meet your original project description and goals?

With this first prototype, I was able to meet the size constraints I placed so it would be actually practical to wear this device. I was also able to achieve pulsated cooling, but not heating due to a circuitry problem. It actually did cool me down in a uncomfortably warm environment so that’s the main reason why I would consider this first prototype to be a success.  I am also still working on ironing out the kinks with the six levels of heating and cooling.  Also, a lot of testing is required in order to find the optimal frequencies.

What were the largest hurdles you encountered?  How did you overcome these challenges?

The largest hurdle I encountered was a short that I had on my PCB. It took me about two weeks to locate with the help of Professor Ponto. Originally, I thought it was a problem with the voltage boosting section of my circuitry that is needed in order to drive the thermoelectric cooler.  It turns out the problem was not with that section, but rather with the H-Bridge circuitry that enables a voltage to be applied across a load in either direction.  If you look at my electrical schematic below, the circled resistors should be pull-down resistors and connect the gate of the transistor to ground so when there is not a HIGH signal, the state of the transistor will not be floating.  But, as, you can see, they are currently connected to 5v, which activates both transistors and causes a direct path to ground.

Problem

Because I didn’t have enough time to redesign a second PCB by showcase, I made a compromise and removed those transistors so now the hardware was only capable of sending cool pulses.  Because I had fried the voltage boosting circuitry earlier, I had to add an external power supply (9v battery) to drive the thermoelectric cooler.

If you had more time, what would you do next? 

The first thing I would do next is redesign the PCB and change those resistor connections so they’re actually in a pull-down state instead of pull-up.  After ensuring cooling and heating is optimized, I would add a thermal conductor attached to the side of cooler that is in contact with the wrist to dissipate the heat more effectively.  Once I reach a prototype that is fully functional, I would like to perform some very scientific user tests with constant variables to see if the device actually makes a difference in improving comfort.  If the tests are successful, I will publish my findings in an academic paper.


CycleSafe

Team Members: Andrew and Emma 

What We’re Going To Do: We’re developing a cycling jacket that incorporates sensors and LEDs as brake lights and turn signals to eliminate the need for hand signals. Additional features may include pressure sensors to contact emergency services in case of an impact, and vibrators to provide directions. 

Concept Art:


Inspiration: We felt that hand signals made by cyclists are not always clear or visible to drivers. Wearing this jacket could greatly improve the safety of cyclists. 

Materials and Costs:

Fabric, Zippers, Velcro, Elastic, Seam Tape. Estimated cost: $90 

LEDs, Accelerometer, Battery, Arduino. Estimated cost: $150 

Steps/Timeline: We just ordered sample fabrics last week so we’re hoping they come in soon and will have a final fabric picked and ordered by next week. The technology has also been ordered. We hope to have a final muslin sample of the jacket completed by November 18th. The remaining time will be dedicated to completing the final jacket and testing.

Backup/Fallback: We are hoping to allow ourselves enough time for troubleshooting so that we will not need a backup/fallback plan. If this doesn’t happen to work we will create something less intensive than a full jacket and something that would be more like encased wire that you can put on over whatever you’re wearing (similar to what Jess suggested last week). 

Final Project Post

IMG_0297 Jacket1

DS501_poster  
2.) Describe what your project does and how it
works 
 
 Our CycleSafe jacket is geared towards
cyclists looking for a safer way to ride. The jacket is made out of a
comfortable, lightweight nylon ripstop. The sleeves are equipped with LED turn signals that can be controlled with a button located in a sleeve that the rider can insert his/her finger into. Another strip of LEDs is located in the back of the jacket and acts as a brake light controlled by an accelerometer. All computer parts are located in the right pocket of the jacket where they can be easily removed for charging.

 3.) What are your overall feelings on your project? Are you pleased, disappointed, etc.?
 

We’re quite happy with the outcome of the jacket. We wish we had a little more time to troubleshoot the electronics because the accelerometer could be better, and there seems to be an issue with the lights. Additionally, it would have been nice to sew in the circuits rather than have wires.


4.) How well did your project meet your original project description and goals?


 Our final jacket met our initial goals pretty well. It does exactly what we wanted it to do on the basic turn signal/brake level. 


 5.) What were the largest hurdles you encountered? How did you overcome these challenges?
 
From a design perspective one of the biggest challenges was working with athletic fabric. We haven’t had a lot of practice with working with stretchy material but it ended up being fine. On the technology end our biggest struggle was dealing with some difficult hardware components. Some of the components did not behave as advertised, and it was difficult to trouble shoot why.
 
6.) If you had more time, what would you do next? 
 
 If we had more time we would spend more time troubleshooting the electronics. We would also sew in the circuits rather than using wires. Additionally, we would like to add additional features like force sensors, and bluetooth integration for GPS directions.

Safeband Final Post

10854031_1032051016821748_333124964_o

Describe what your project does and how it works

The Safeband is a wristband designed for emergencies. Once connected through Bluetooth the Safeband app can run on the background of your smartphone. In case of an emergency you just need to push the discreet button of the wristband and an email with your name and location are going to be sent to your previously selected contacts.

What are your overall feelings on your project? Are you pleased, disappointed, etc.?

We are very pleased with the project. Although the life sensor feature could not be implemented in time due to hardware, time and knowledge limitations we managed to learn a lot when working with the Arduino and its Bluetooth. We enjoyed the project to a point that we are going to try to evolve the idea a little more when we are back to Brazil.

How well did your project meet your original project description and goals?

The very first goal of the project was accomplished. We left all classes with a feeling that we had learnt what we needed for that day to continue to press forward with the project. We were worried at the beginning that the life sensor was changed for an accelerometer and later canceled, but these features were addons in the first place so our project did meet the original project description.
What were the largest hurdles you encountered? How did you overcome these challenges?
The lack of knowledge for sewing and electronics impacted our progress in the beginning, but we teamed up with Vinicius Furlan and Jhonatt Lima and we managed to learn the basics in electronics. The Firebase also helped a lot in the app development, but we lost some time trying to understand the inner workings of installing and running plugins and they were necessary for the Bluetooth connection. Luckily Victor found some results after some hours of struggle.

If you had more time, what would you do next?

Certainly we would improve the Bluetooth connection and add text message support. Seeing how the Internet is as not reliable as SMS we would be better off with a product that supports this kind of communication. Also, in Brazil is much more common to not have an Internet data plan and sending emails would be much more restricted than in the US. The life sensors that we could not add with the time we had available would be a nice feature to have as well.

Gaming Gloves Final Post

Gaming Glove Presentation

WP_20141212_17_21_46_Pro

WP_20141212_17_21_58_Pro


Describe what your project does and how it works
So our project is basically a semi-glove made to play without needing a keyboard. It have pressure sensors in the tip of each finger; When the user press the finger against a surface, the difference of pressure sends a signal to the Arduino board and it computes the signal and recognizes send it via Bluetooth to the computer. The application running in the computer receives the signal and simulates a keystroke pretending that the user is pressing that key on keyboard.

What are your overall feelings on your project? Are you pleased, disappointed, etc.?
Satisfied. After a lot of hard work and problems with pressure sensors (we tried velostat at first and it didn’t worked well) and coding (we discovered that a keystroke isn’t the same than sending the corresponding key to the console) it worked like we expected and meet with what we expected to do in the end.

 How well did your project meet your original project description and goals?
Pretty well. We wanted to make the use of a keyboard to play games dispensable and in fact we did this. Our only limitation was the amount of keys that can be pressed with only five alternatives, which limits how many games can be played using the gaming gloves. But we already thought about how to fix this limitation in a future prototype: using a shift key in one of the fingers to double the alternatives of the remaining fingers. And if 8 keys isn’t enough, the user can make combo movements with fingers to create more commands.

What were the largest hurdles you encountered?  How did you overcome these challenges?
The keystroke issue and the velostat. About the velostat: we just figured out that velostat was not the best option to do what we wanted because of it was not sending a reliable signal when pressed so we just changed to pressure sensors and fixed this problem. About the keystroke issue: After finishing the code (at least we tought it was finished) we figured out that the glove was working on notepad(it was writing Q,W,E and R when we pressed the corresponding finger) but ingame the skills Q,W,E,R were not working. So after a research we discovered that what we actually need was the software that receives the signal to simulates a virtual keyboard instead of just writing Q,W,E and R. After almost a hole night studying about the code and searching in the internet, we found a library that helped us to do what we need to fiz the problem.

 If you had more time, what would you do next? 
A mouse glove to completely remove the need of having a mouse or a keyboard to play computer games at the comfort of your couch.

TypeSafe final post

ShowcasePoster

Prototype2


TypeSafe is a hand-worn device designed to improve the wearer’s computer usage habits by discouraging uncomfortable wrist postures and encouraging  regular periods of rest during prolonged keyboard typing.  The idea is to help the wearer avoid long-term health problems that can result from excessive and unhealthy computer usage, such as Carpal tunnel syndrome.

The device consists of a finger-worn inertial measurement unit (IMU) and a wristband containing an Arduino microcontroller, vibrating component, and battery. The IMU tracks the orientation of the wearer’s hand. The Arduino program analyzes the orientation data and infers the wearer’s hand posture and typing activity. When the hand posture is inferred to be”bad” (uncomfortable), the device alerts the wearer with vibration. Moreover, the device keeps track of how long the wearer has been typing and produces vibration to let the wearer know when they should take a break.

Both hand posture and activity inference are accomplished by performing analysis of the orientation signal. Current posture is classified as bad when orientation significantly departs from the neutral (healthy) hand posture, while typing activity is inferred from high-frequency content of the orientation signal.

The device currently exists as a fairly crude prototype. Although most of the planned features of the device are supported in the prototype, their implementation is still very basic and lacking in robustness. The original project plan foresaw several iterations on the prototype, during which I would have performed more principled collection and analysis of IMU data during everyday computer usage and development of more sophisticated inference machinery for postures and activities. However, these steps never occurred due to lack of time.

A technical hurdle which proved quite costly in terms of time was getting the IMU to work with the chosen microcontroller (Arduino LilyPad) and obtaining reliable orientation data.  The solutions to this hurdle were relatively simple – changing the configuration of the microcontroller’s SDA and SCL pins, and making sure connections between the microcontroller and IMU were properly soldered. However, diagnosing and fixing these issues took long enough that less than two weeks remained for other steps on the project – data analysis, development of inference models, and user testing.

Given more time, I would make several improvements to the device:

– Use better sensors for posture tracking. IMU seems to be quite prone to drift, which makes it difficult to reliably track absolute posture. Flex sensors (https://www.sparkfun.com/products/10264) may be a better – and cheaper – alternative for this purpose.

– Introduce additional sensors for tracking postures of the elbows, shoulders, and the back, as these are also prone to repetitive strain during computer usage.

– Collect and analyze sensor data during real computer usage and develop trained models for posture and activity classification. This poses an interesting challenge, because these models must be fast and compact enough to run on a microcontroller with limited memory capacity and computing power.

SafeBand – 07/12

  • What did you do this week?

We worked on the Bluetooth connection and on the send e-mail functionality from the app.

The Bluetooth is working fine and the app is now able to send e-mails.

  • Describe the problems you encountered

We had problems to send e-mail due the filter encountered in the major e-mail web services companies such as Google and Microsoft Office. To solve this problem we had to use a external framework called MailGun (https://mailgun.com)

  • Describe the successes you had

Now we’re able to send email through the app and the Bluetooth connection looks like to be working fine.

  • Are you on schedule?

We’re a little late, but we will be able to finish everything.

  • What do you plan to do next week?

We will make the necessary connections between smartphone and the device and sew everything.

Gaming Gloves 12/7

This week we finished the finger’s cover with the pressure sensors added to it. As you can see in the picture below, we made a two layer’s cover to hide the sensors. We had already tested and all of the sensors are working perfectly by sending a response whenever it suffer any pressure. The arduino code is already done and we plan to finish the software by Wednesday. Besides the software all we have to do is just finish to plug all components of the glove in the actual prototype what should take us less than a day.

WP_20141207_20_32_30_Pro

12/7 TypeSafe

This week’s activities:

– Got a nice sweatband and used it to build the first, rough prototype of my device. This involved quite a  bit of stitching, soldering, connecting things with wires, and taping them to other things. Here is what the prototype looks like:

Prototype1

– I’ve also written a good chunk of the Arduino code, though the meat – activity and posture inference – is still missing.

Problems encountered:

– My first attempt at prototype didn’t work at all. IMU was unreliable, due to wiring issues, and I also had a few shorts due to stitching issues (stitching  on this wristband is not as easy as on a rectangular piece of fabric).

Successes:

– All of the hardware problems that plagued me before seem to have been resolved.

I’m behind my original schedule, but reasonably confident that I’ll have a working prototype in time for the showcase. It just won’t be as full-featured or as pretty as what I originally envisioned.

Plan for next week:

– Implement the activity and posture inference in software.

– Demonstrate a working prototype of the device.

– Make a poster.