1. Image or video:
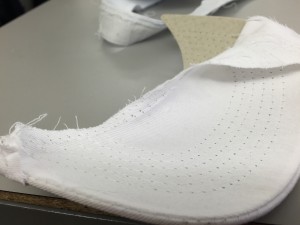
What you see is the brim of a cheap hat I deconstructed. There’s a few things to take away from the way it’s put together. Firstly, the material is plastic – it looks like cardboard, but it’s a cheap recycled plastic material similar in composition to MDF. This makes sense, because waterproof hats are usually a good thing. Secondly, there’s no glue involved. The fabric is held to the brim with what I had originally assumed to be decorative stitching.
2. Listing of accomplishments:
Well, I ripped apart a hat. I got the majority of the electronics sourced and shipped, although some are still in transit. I did a fair bit of research on construction of PCBs, including etching techniques, unusual substrates, and surface-mounting device soldering. Then there was figuring out how sewing machines work and finalizing the embedding of circuitry in the hat brim.
3. Description of problems:
Still trying to figure out the best way to hide the ‘bumps’ caused by the ICs on the brim. Probably best to just carve out space in the brim and putting the circuit copper-side down. One last issue I hadn’t anticipated is how the not-so-decorative stitching might affect the circuit on the brim. I have some ideas, but it will take some experimentation.
4. Plan for next week:
Next week I’ll design the circuit for the brim and finish sourcing the necessary parts for putting it all together. I still need the ferric chloride and the appropriate toner, but all the other parts should come together fairly easily next week.
