Back ordered

The Bad News:

The Felxinol I ordered was out of stock, which put me a week behind on my timeline.

The Good News:

The revised order has already shipped and I should have it by the end of the week!

In other news…

I started doing some testing on the textiles for my exhibition piece.  I felted a test piece and did a Thiox discharge, which worked great!

FeltTestOn the topic of other projects, I finally finished adding the LEDs to the Lightning Gown and ran a testing program – they all work!!  I have a fabric bend sensor kit coming soon that I will install to get the gestural response I was looking for.

The “Moodie” has been accepted to the fashion show and has also been submitted to Design Gallery 2014.  Rather than have the sensors freak out while on display, I found some code to create a looping crossfade of colors in the RGB LEDs, which looks great.

Hurry up and wait…

Unfortunately, not much progress has been made this week.  I’ve ordered some additional Flexinol in longer lengths and I can’t really do any additional tests until it arrives.

In the mean time, I have purchased smaller gauge music wire that I think will work well for the spring mechanism.  I’ve also done some research on how I can run the Flexinol using an Arduino:

FlexinolActuatorWireI also assembled a more complete presentation on the installation:

Project3

Experiments with Muscle Wires

I’m fortunate to be able to tie my current research into an upcoming site-specific exhibition piece, which will be shown at the offices of Life technologies, a local stem cell research lab.  When we toured their facility, we were shown some amazing video of cardiac cells independently pulsing in a ring format.

CardioVortex_4XThis has become my inspiration point for the installation.  It is my hope to use muscle wires to create the pulsing effect on my printed textile, potentially tied to some sort of motion sensor or other input.

In order to gain a familiarity with the basics of muscle wires, I completed the Origami Flapping Crane tutorial provided by MIT’s High-Low Tech Lab.  This was a great little project that very successfully illustrated the basic use of Flexinol wire.

https://www.youtube.com/watch?v=wQKggIUqx0s

With that success under my belt, I started experimenting with ways to utilize the muscle wire’s contracting properties to create the pulsing circles on a textile (most likely felt in this case).  One of the core issues with Flexinol is that while it contracts when heated, it does not return to it’s original length when cooled.  An opposite force of some kind must be applied.  In the flapping crane example, the stiffness of the paper is enough to pull the wire back into shape.  A little research led to the suggestion of using music or piano wire as a kind of spring, both to actuate the fabric and to return the wire to it’s original length.

My first spring concept:

SpringOneThe red lines show where the muscle wire would be attached.  This arrangement would allow the muscle wire to contract the music wire while maintaining a circular shape.  Unfortunately, the music wire I chose was far too strong for this application and the muscle wire was unable to move it.  On a whim, I tried a more low-tech option and just sewed the wire onto a piece of felt in a similar arrangement to see what happened.

FeltTestThe results were also less than successful.  Apparently one of the other limitations of Flexinol is that the overall change in length is very small, along the lines of 5-7%.  So while this arrangement moved the fabric, it didn’t move it very far.

My next step is to modify my plan based on these outcomes.  I am going to purchase much thinner music wire to use as my spring.  I am also going to break the muscle wire down into smaller length attached to each segment of the spring, as opposed to one continuous piece.  I think this will help me to maximize the movement potential of the Flexinol.  Also, this will potentially give me more control options over the final movement effect.

Week of 3/3/14

(Sorry for the late post – I’ve been having VPN issues with my laptop)

Copper Taffeta:

I finally got a good result on my taffeta etching!  I perfected the salt/vinegar ratio and applied the vaseline more thickly and everything came out great.  Mostly.  While running resistance tests, I wasn’t getting any readings on my multimeter.  I think that the thicker vaseline left a coating on the fabric, which is affecting the conductivity.  I’m working on one more test with thinner vaseline application and a shorter processing time to see if that gets me there.  Next steps: attach an LED and a battery to a fabric “circuit” to see how it functions, then dyeing the polyester backer on the fabric and evaluating if that affects conductivity.

Muscle Wire:

Digging a little deeper into the topic, I’ve found additional levels of complication.  Specifically, in the training of Nitinol wire.  According to many of the sites I’ve been researching, shape training Nitinol requires heating it to 500 degrees and holding it there for 25 minutes.  This sort of heating usually requires a furnace, which I don’t have.  Also, the drawback of this heating method is that it can make the wire brittle and more likely to fail when moving.  Fortunately, I found a teaching guide here which suggests an alternate heating method, via electric current.  I think this is an experiment I’ll be saving for over spring break.

However, the pre-trained Flexinol wire seems much easier to use.  In order to jump right in and make some progress, I’m going to use a tutorial from MIT’s High-Low Tech lab to create a flapping paper crane:

5884436523_1747d41803It’s a nice small-scale project that will allow me to get a feel for how the Flexinol functions on a substrate (paper) that is similar to fabric.  Now I just need to learn how to fold a paper crane!

Not as easy as it looks…

…has been my on-going experience with the copper taffeta experiments.  My second attempts didn’t even make a dent in the taffeta fabric for the first day or so.  I left it in the bath (because, why not) and when I checked it again several days later the copper had etched away – including the portions covered by Vaseline!  I think that screen printing creates a film of Vaseline that is too thin to adequately resist.  I’m thinking that stencils will be a better choice going forward, with the possibility of laser cutting them once the forms become more complex.  I started a third vinegar bath last night with a thicker Vaseline layer and am hopeful I’ll get a cleaner outcome.

I did a little testing with my multimeter on my original sample.  As expected, my readings were all over the board.  I think the key will be to get a crisp separation between copper coated areas and base polyester areas.  In my research I stumbled across a diagram of the Lilypad PCB:

This would theoretically allow me to build an Arduino into the actual fabric of a project.  Finds like this make me even more determined to work out the bugs on the copper taffeta process.

I also received several samples of muscle wire from SparkFun, both Nitinol and Flexinol.  I’ve been doing some research on the specifics of working with these materials.  Since I have 4 different samples, I’m going to try 2 variations in each wire type – one set up utilizing the natural contraction of the wire and another where I “train” the wire to a shape.  I’m using this article by Jie Qi as a jumping off point.  The first steps will be purchasing crimp beads to facilitate attachments and an appropriate power source.  It sounds like if any of my experiments are going to end in fire, it’s this one!

Acid etching copper taffeta

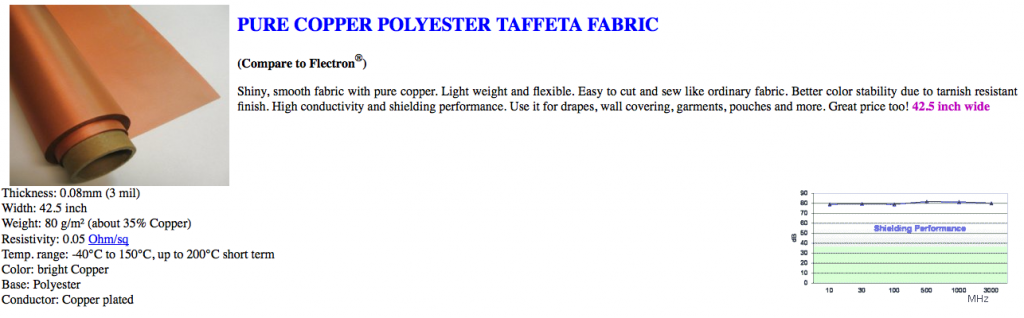
My first round of testing was etching conductive fabric to create circuits.  I’m working with a sample of copper-coated taffeta from LessEMF.

Working off of this tutorial, I began by screen printing a design onto my taffeta with a resist, in this case Vaseline.  I then soaked the taffeta in a vinegar & salt solution, which should etch away the unprotected copper coating, leaving behind the polyester fabric.  The tutorial suggested a minimum etching time of 12 hours, however there was no effect in that time so I left the taffeta in the etching solution for several days.

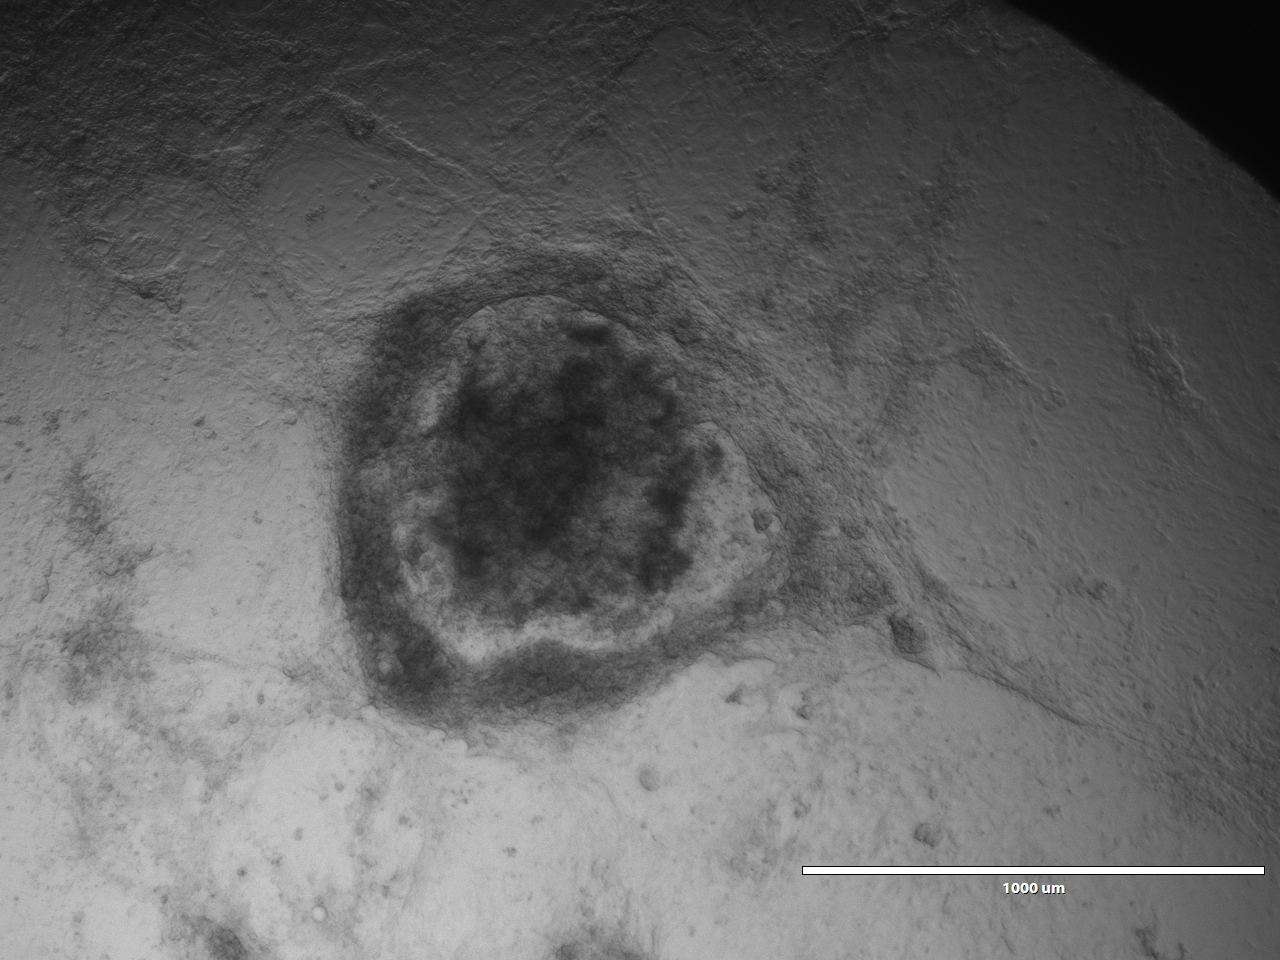
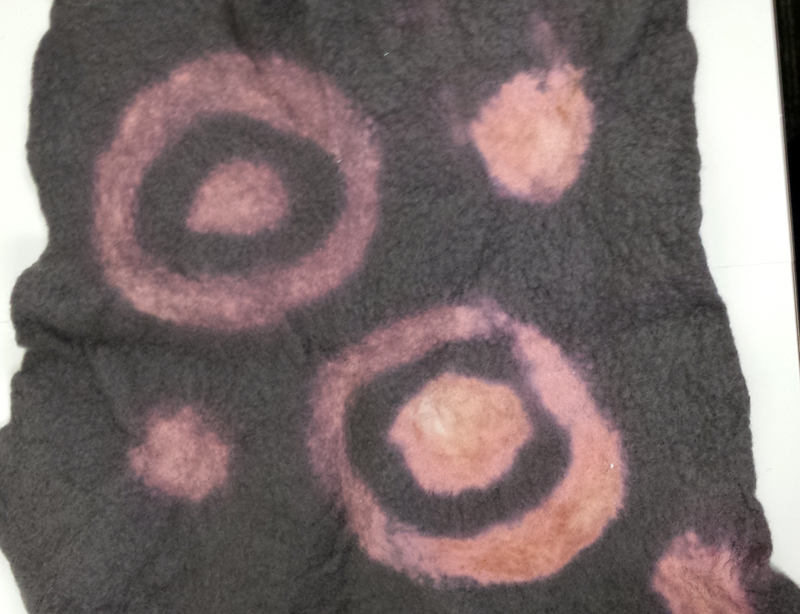
Here is my initial outcome:

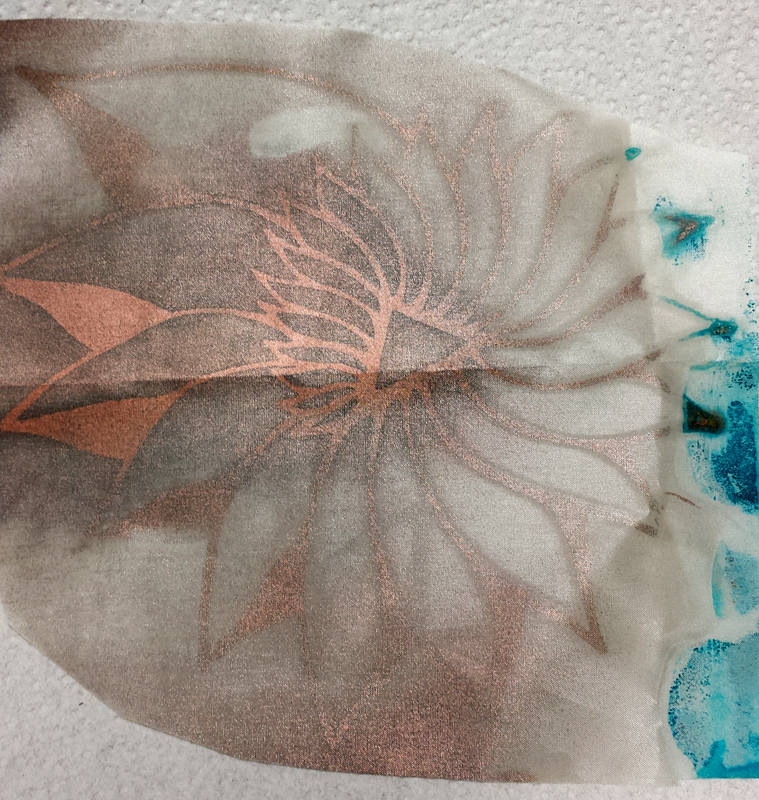
As you can see, while the fabric is etched, the outcome is less than perfect. There are a few variables I am refining for my next test:

1. Solution mix – While the tutorial calls for a ratio of 100ml vinegar to 7ml salt, I transposed things in my mind and tried to mix a solution of 100ml vinegar to 70ml salt.  Once I realized my error, I removed some of the excess salt.  However, I am uncertain what the makeup of my final solution was.

2. Salt type – For the initial experiment, I used pickling salt because it was what I had on hand.  For the next round I will be using standard iodized salt, in case the iodine content  factors into the etch.

3. Container – The first test was executed in a basic Tupperware bowl, which I quickly realized is not the ideal container given the delicate nature of the Vaseline resist.  Subsequent experiments will be conducted in a shallow pan.

4. Resist thickness – It may be beneficial to apply the Vaseline more liberally when printing, in order to better protect the copper from the etching solution.

Next steps:

I am going to put together a second round test, applying what I have learned from the initial experiment.  Once I get a clean etch, I am going to experiment with a few different dye formulations to see if it is possible to color the white taffeta without affecting the conductivity of the copper plating.  Also, I’d like to use a multimeter to test the conductivity across my etched design to start getting an idea of any potential size limitations.

eTextiles Project Proposal & Timeline

Topics:

The main area I would like to pursue in this independent study is a deeper dive into the integration of textiles and technology. Some possibilities I would like to explore include:

  • Creating fiber/textile sensors

  • Nitinol “muscle” wire

  • Conductive textiles

  • Screen printing conductive paint

  • Acid etching copper taffeta

I would also like to refine the programming on my existing Arduino projects (the Moodie and the Robe a la Foudre) and do more explorations into the application of biometric sensor data to my designs.

Final Project(s):

I will do some exploration and experimentation of each technique before choosing the 3 most successful/relevant techniques. I will then expand each of the 3 techniques into a small “proof of concept” project that is suitable for exhibition.

Calendar:

Week 1 [2/3 – 2/9]

  • Order supplies

  • Test vinegar etching on copper taffeta

Week 2 [2/10 – 2/16]

  • Spinning conductive fibers

  • Knit/crochet conductive yarn

Week 3 [2/17 – 2/23]

  • Continue knit/crochet sensor experiments

  • Test options with other conductive textiles

  • weaving?

Week 4 [2/24 – 3/2]

  • Test nitinol wire uses/limitations

Week 5 [3/3 – 3/9]

  • Test conductive paint screen printing

  • Test screen printing resist on copper taffeta

Week 6 [3/10 – 3/16]

  • Test dyeing etched copper taffeta

  • vast disperse dye vs. heat set

Week 7 [3/17 – 3/23]

  • Project 1 begin

Week 8 [3/24 – 3/30]

  • Project 1 cont.

Week 9 [3/31 – 4/6]

  • Project 1 completed

  • Project 2 begin

Week 10 [4/7 – 4/13]

  • Project 2 (cont.)

Week 11 [4/14 – 4/20]

  • Project 2 completed

Week 12 [4/21 – 4/27]

  • Project 3 begin

Week 13 [4/28 5/4]

  • Project 3 (cont.)

Week 14 [5/5 5/9]

  • Project 3 completed