Final Post with code and image

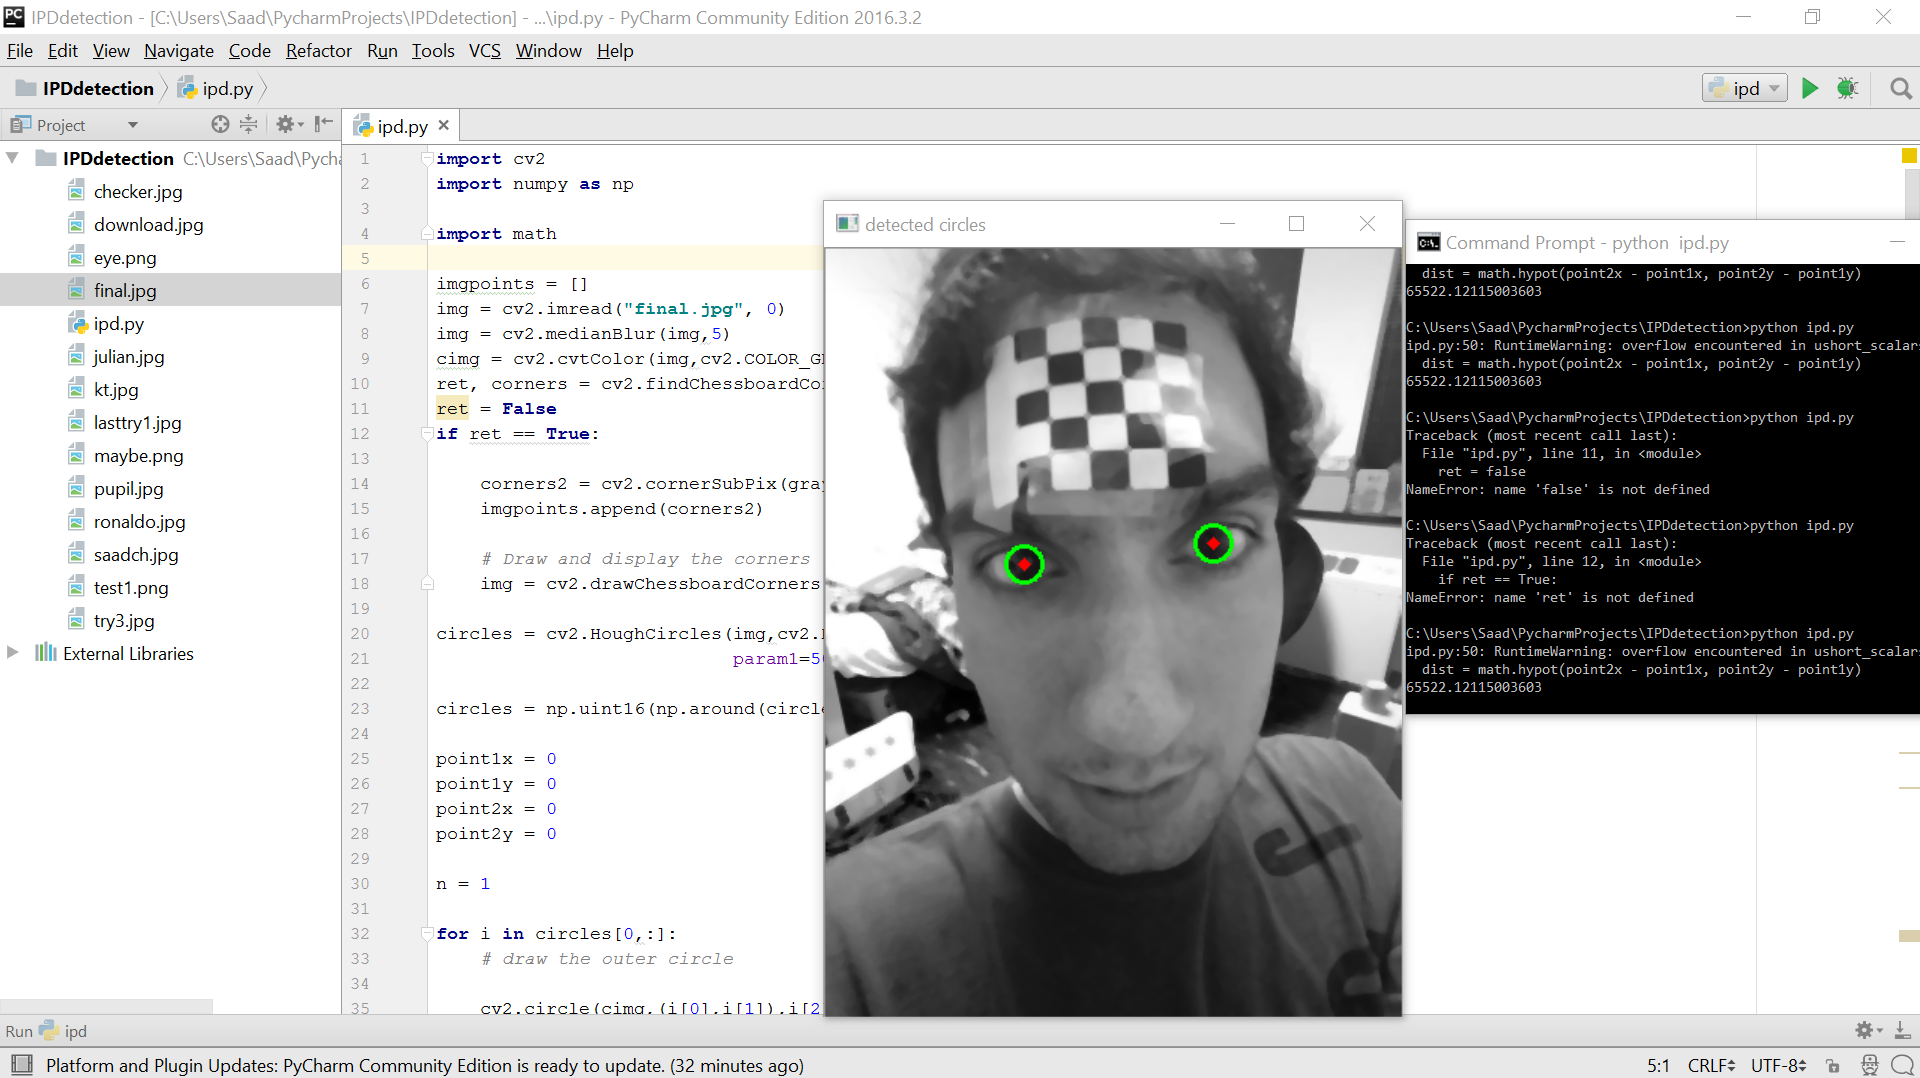
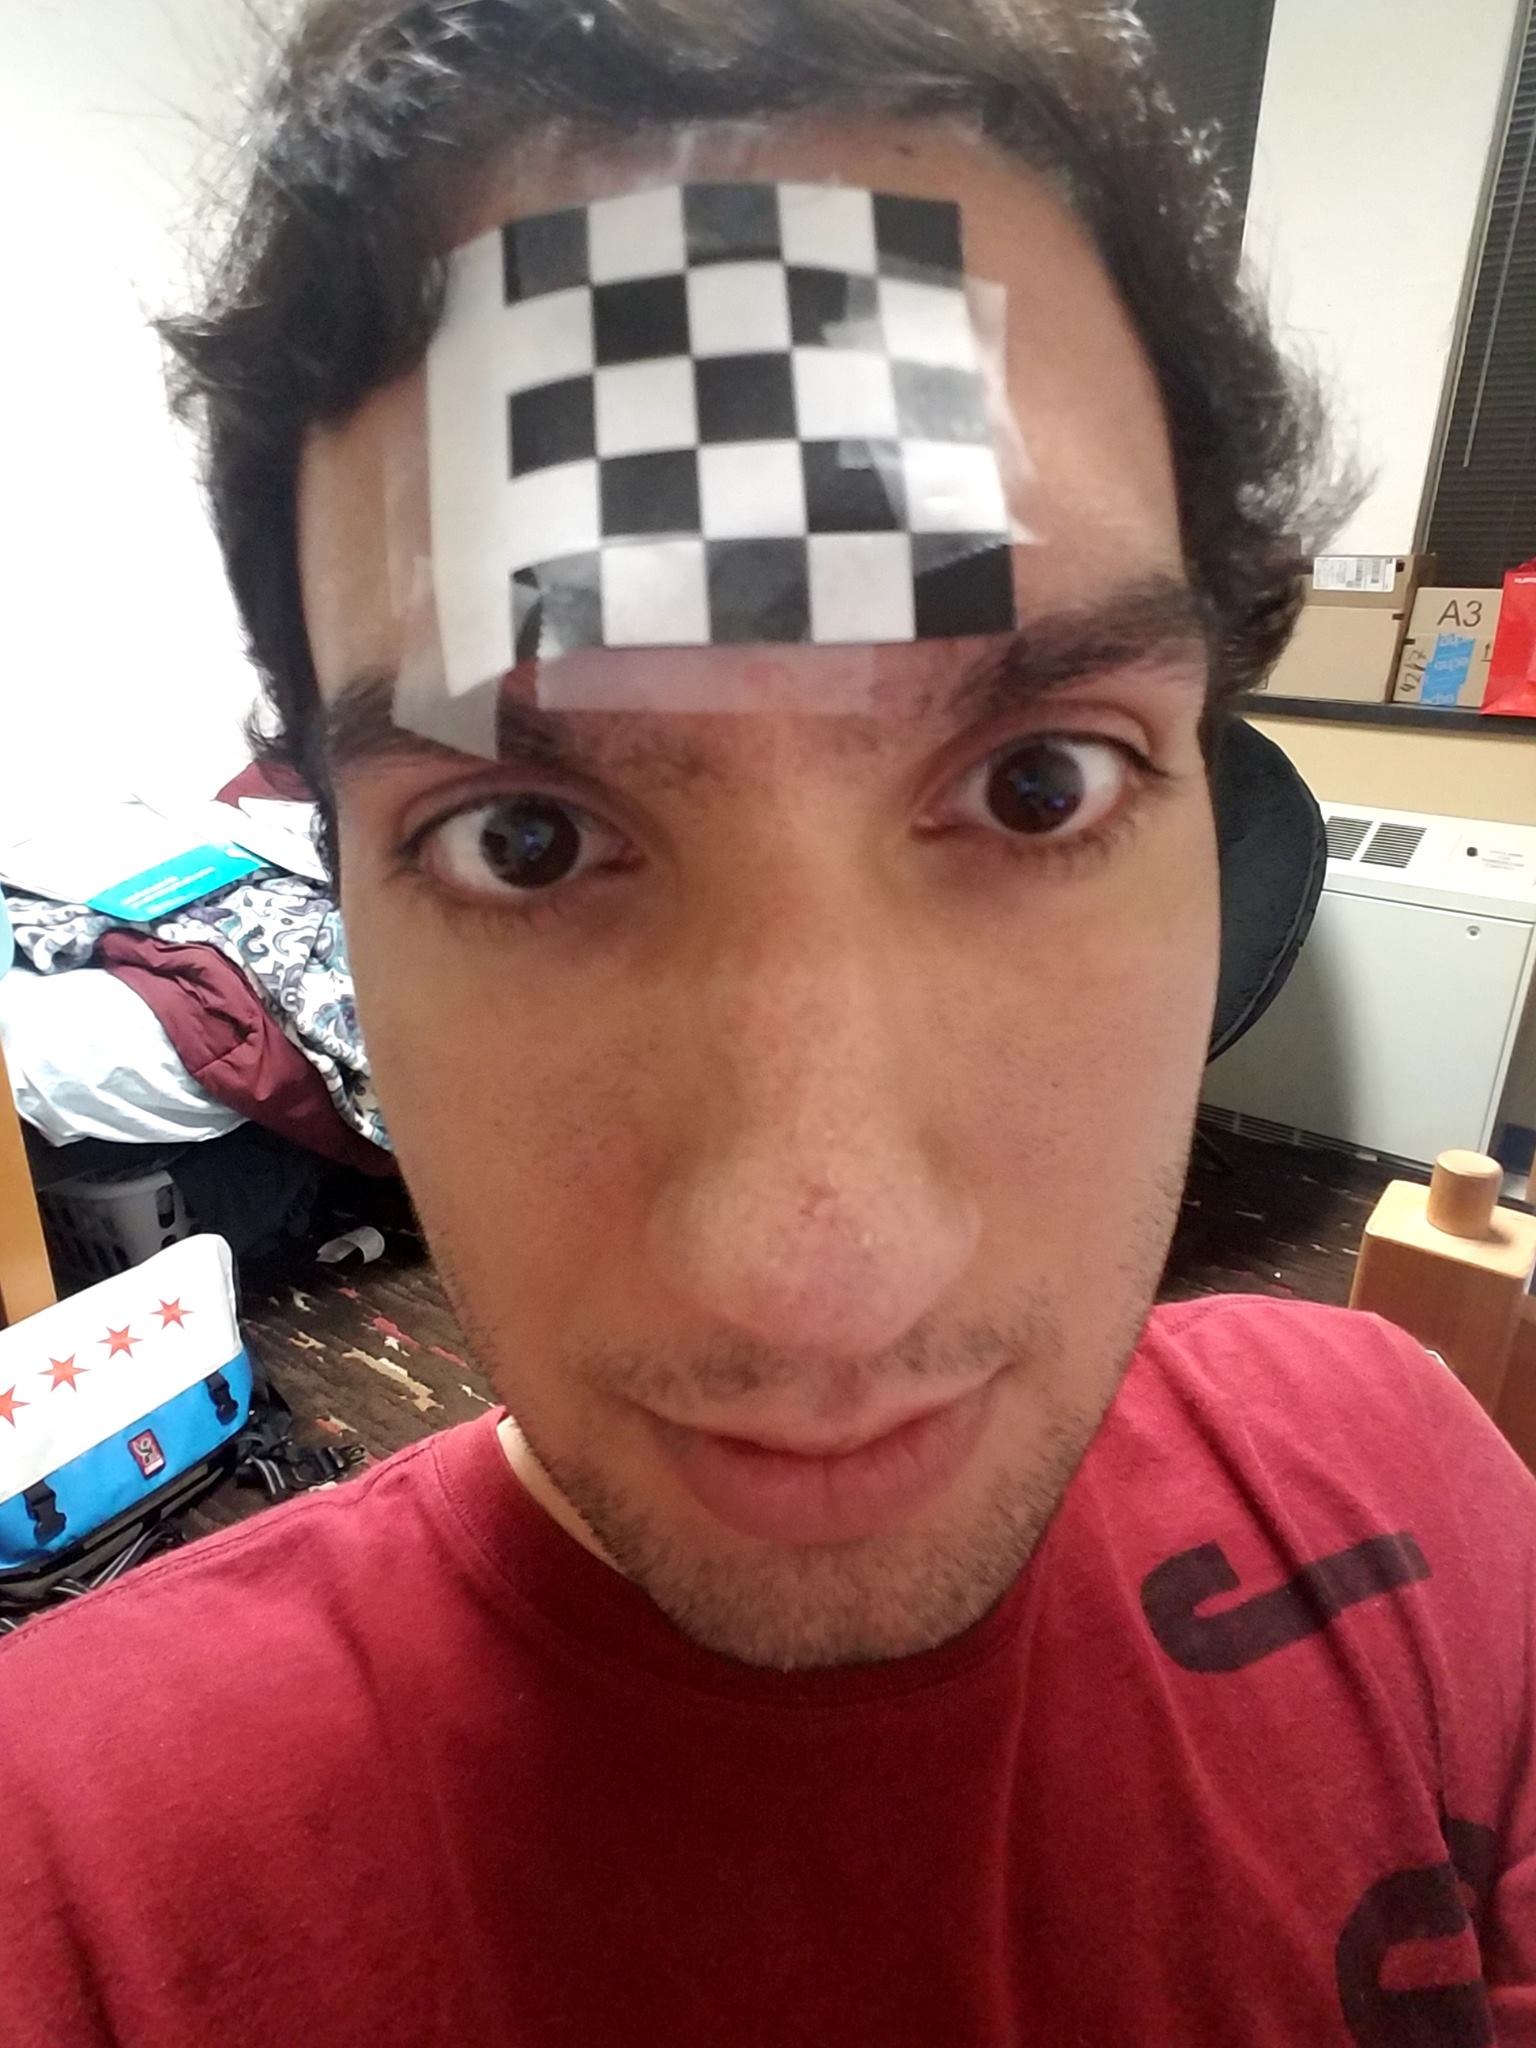
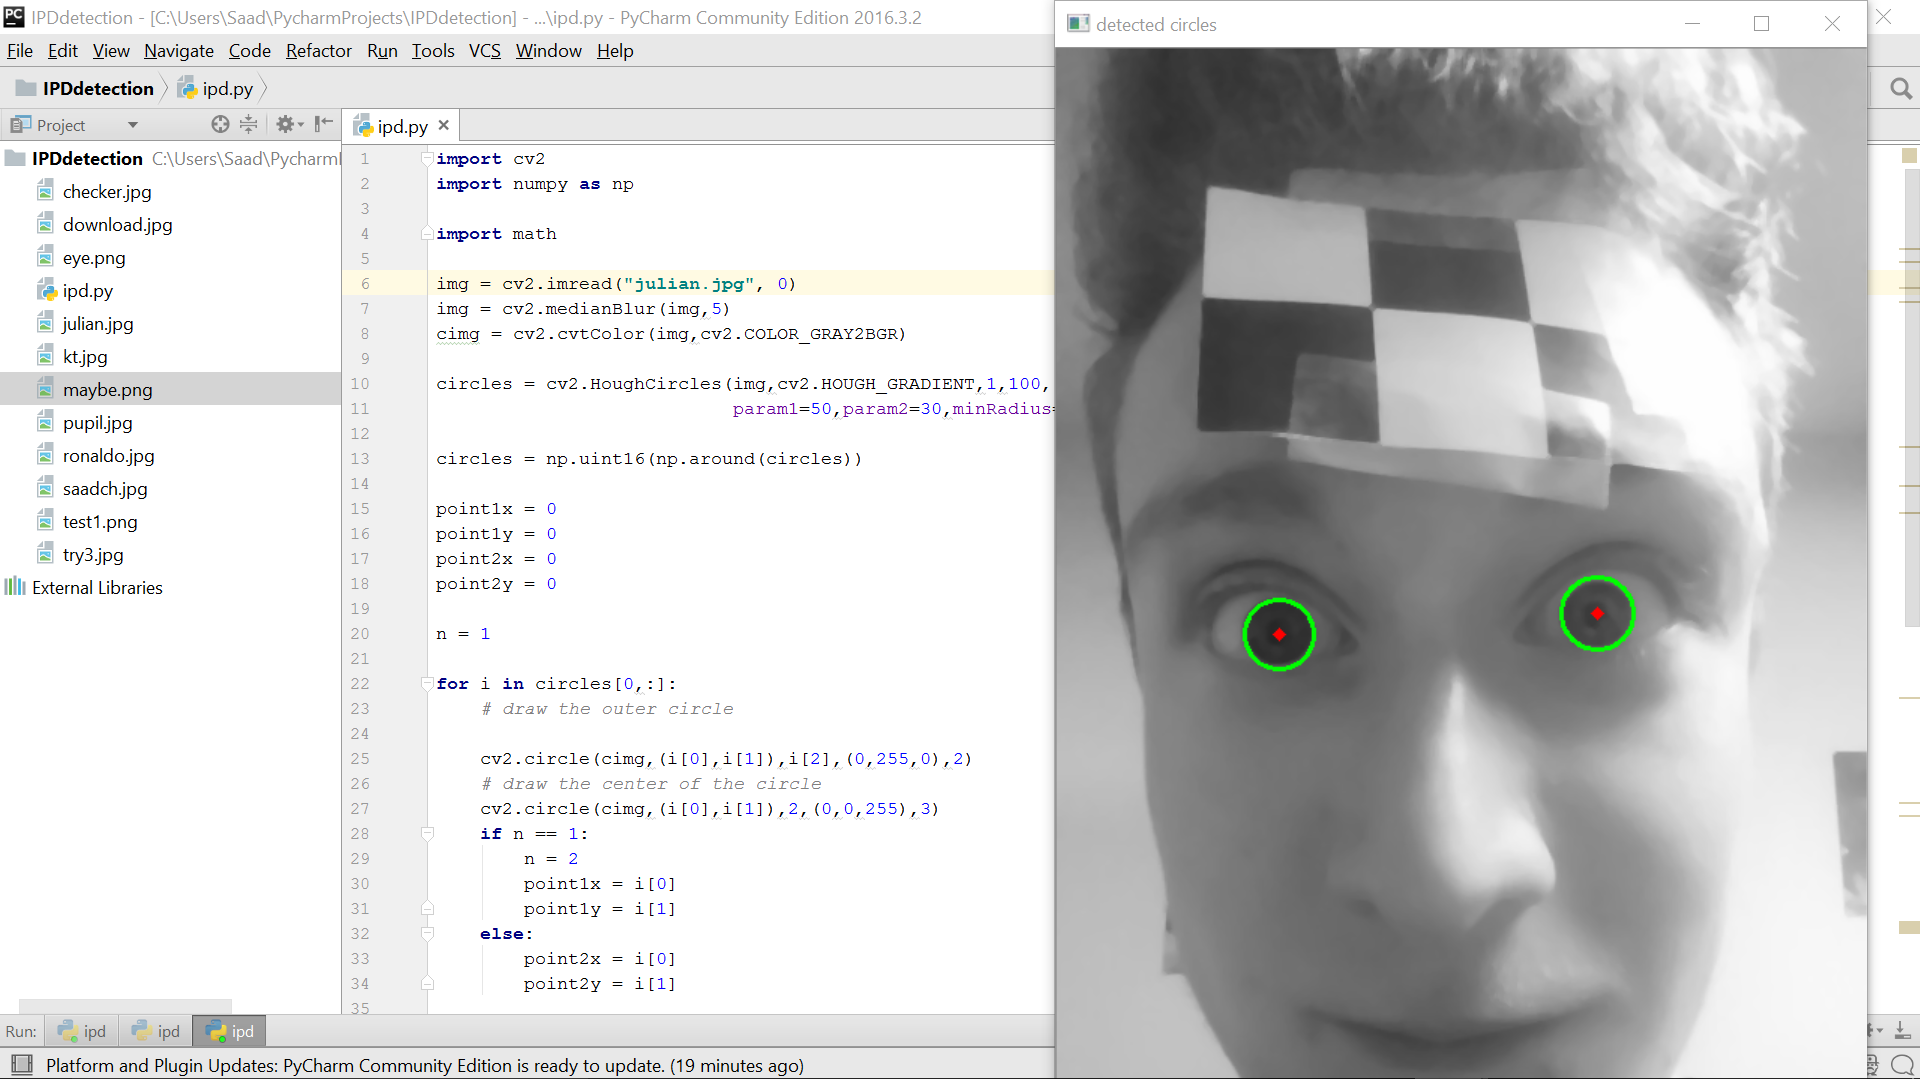
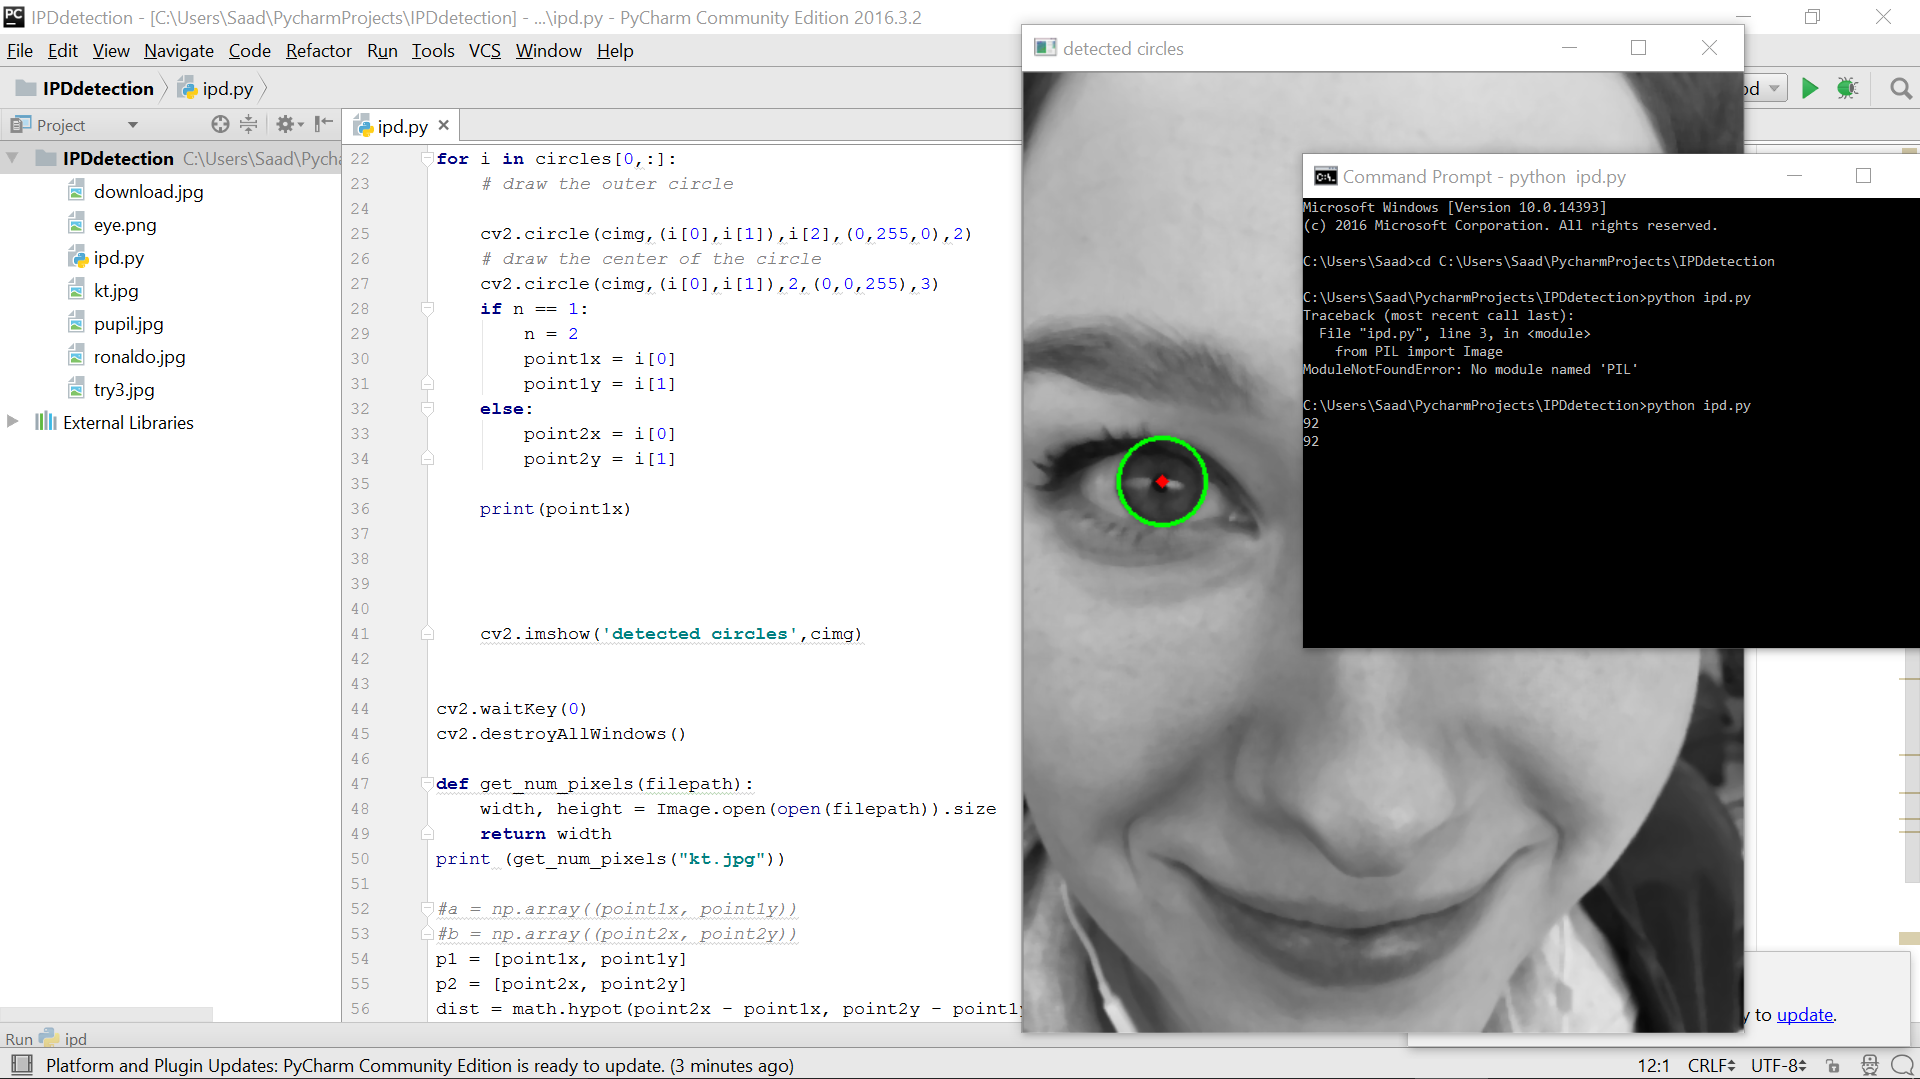
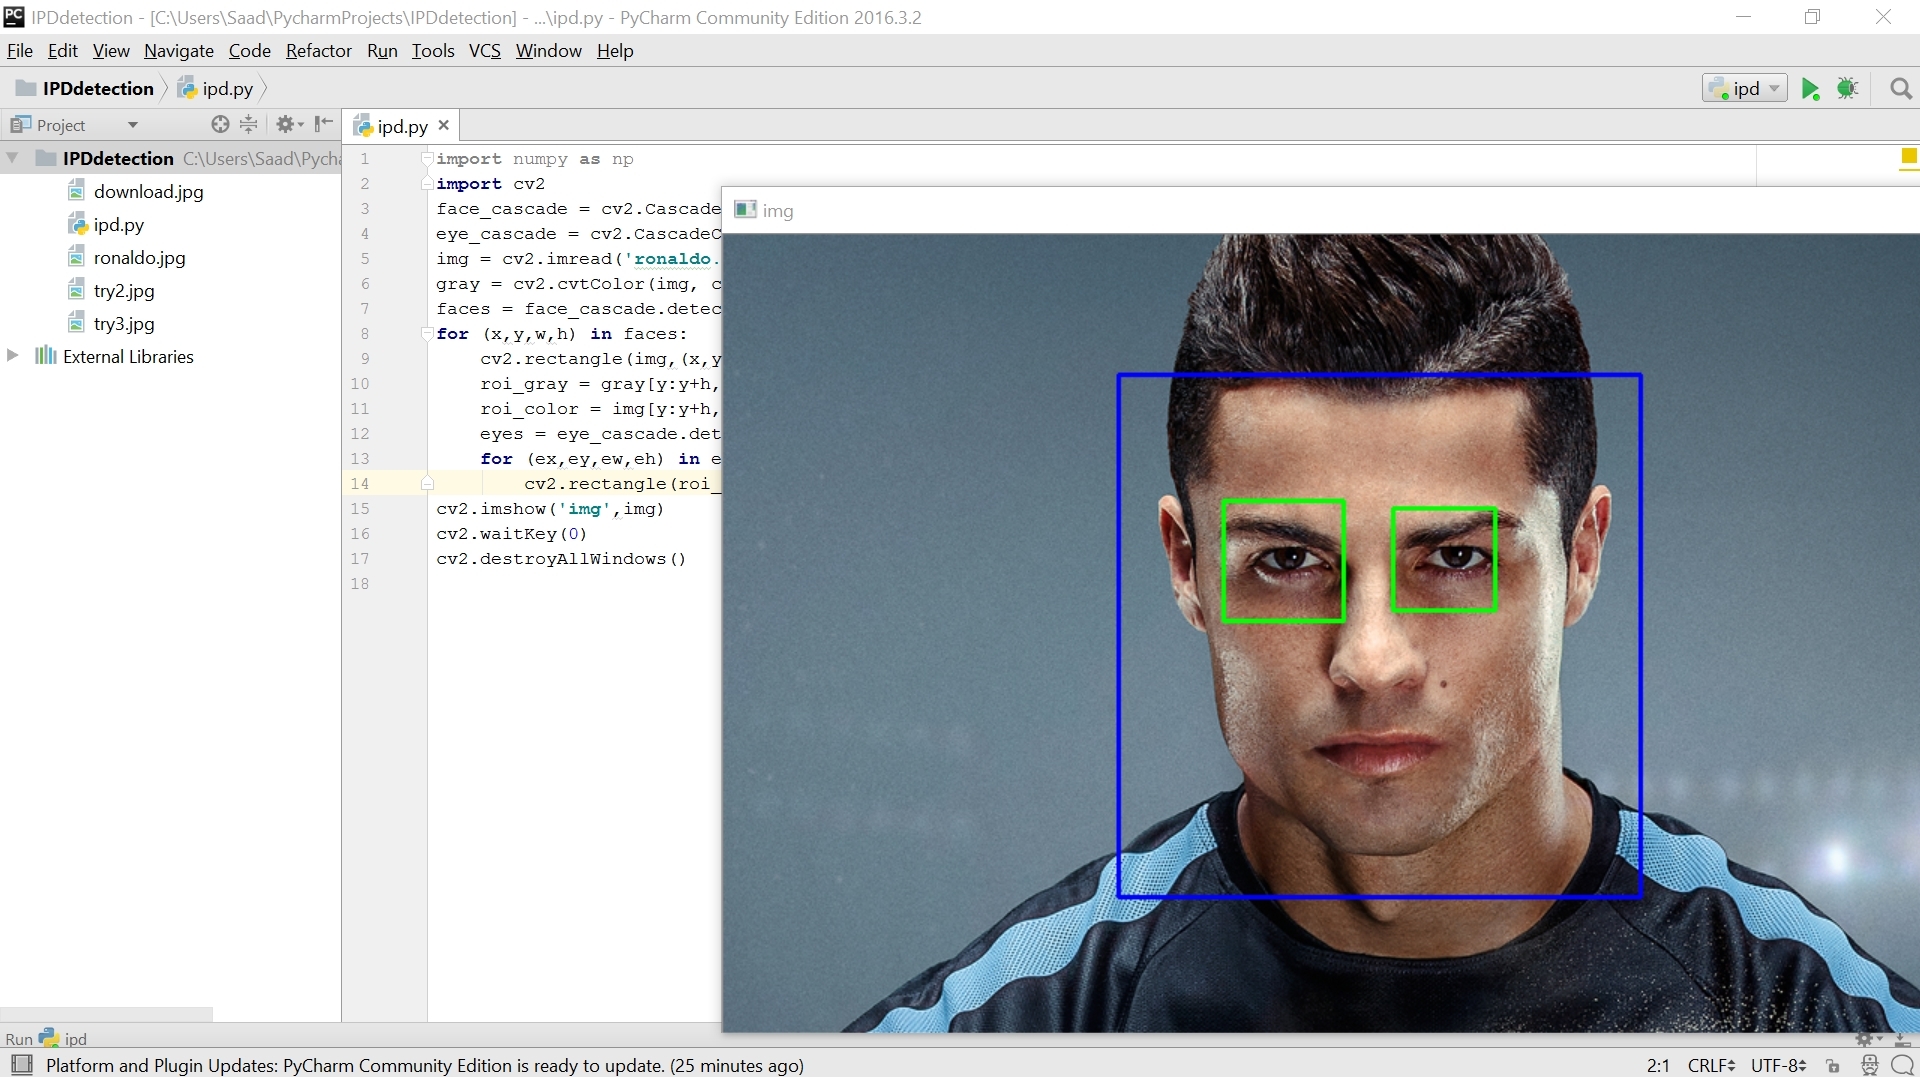
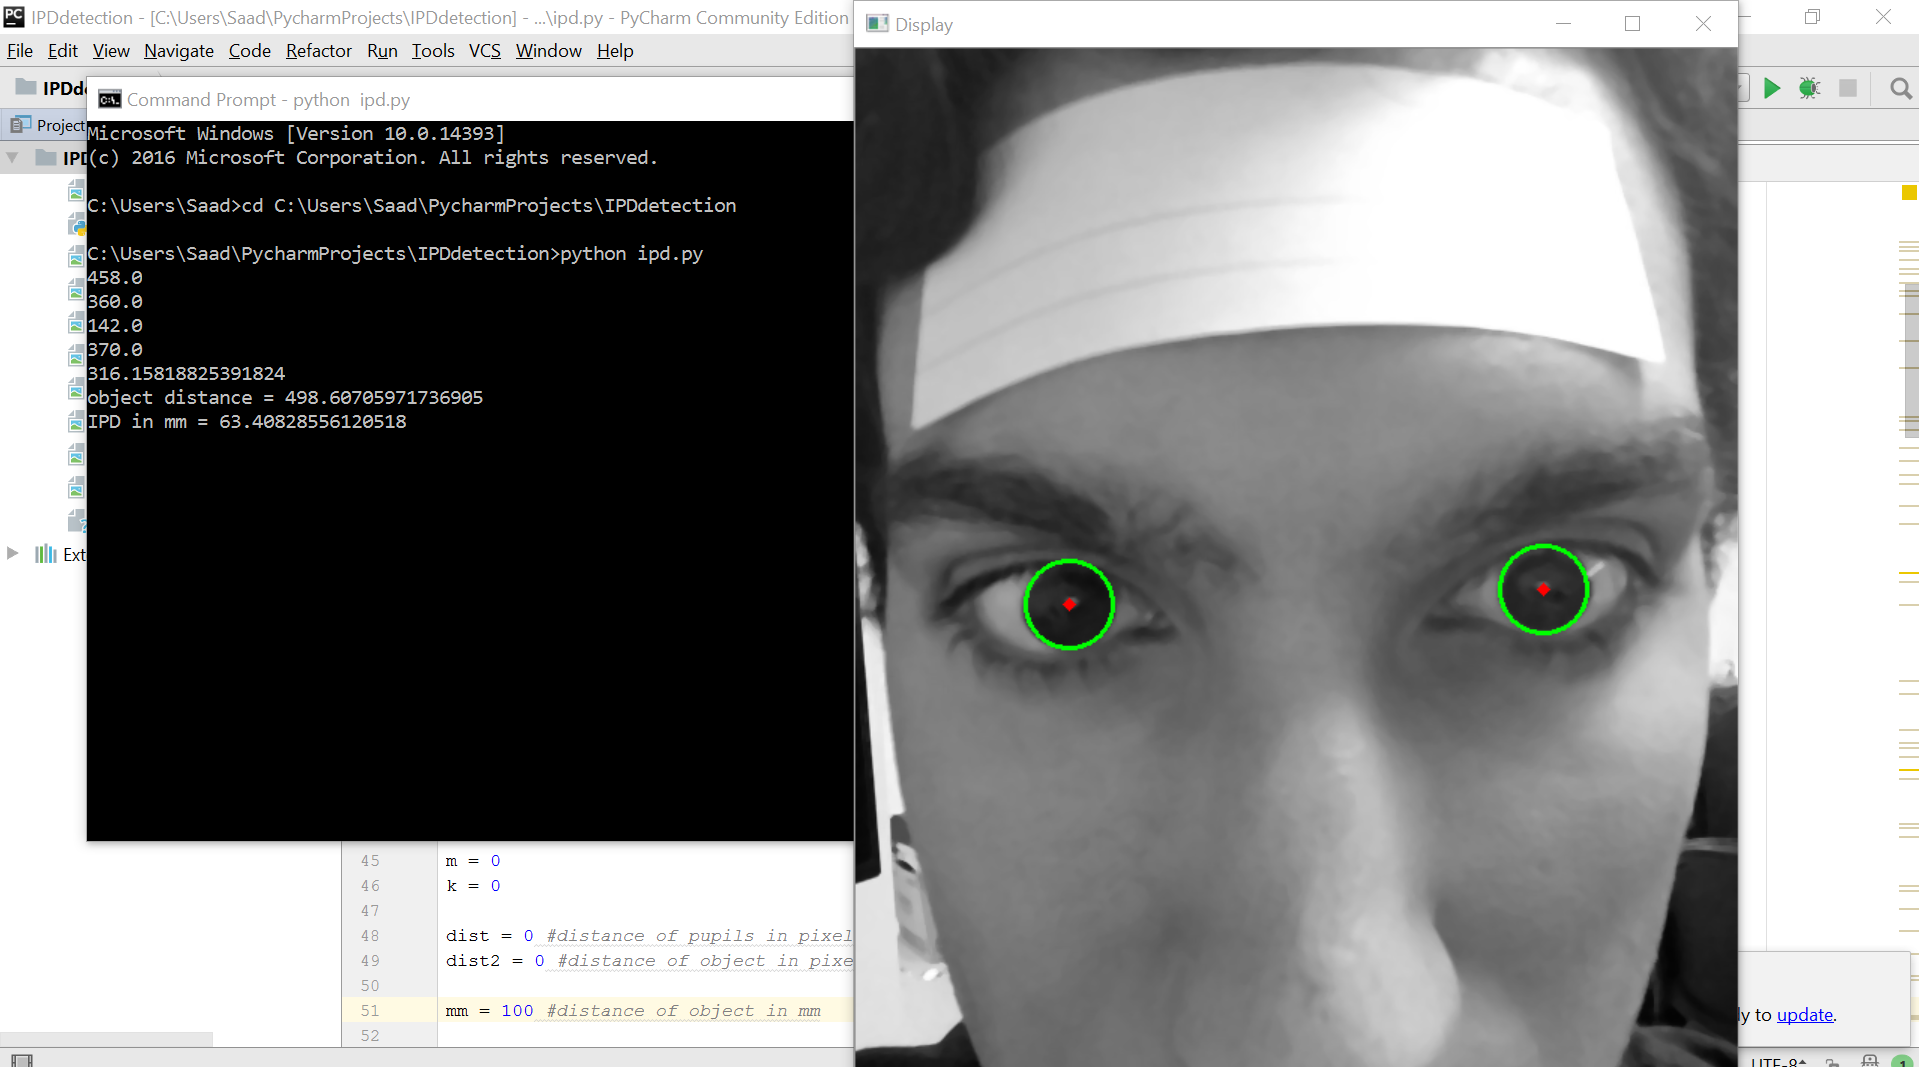
Here’s how the project turned out:

final

And the code for the project:

import cv2
import numpy as np
import argparse

import math
from scipy.spatial import distance


#ap = argparse.ArgumentParser()
#ap.add_argument("-i", "--image", required = True, help = "Path to the image")
#args = vars(ap.parse_args())

#img = cv2.imread(args["image"])
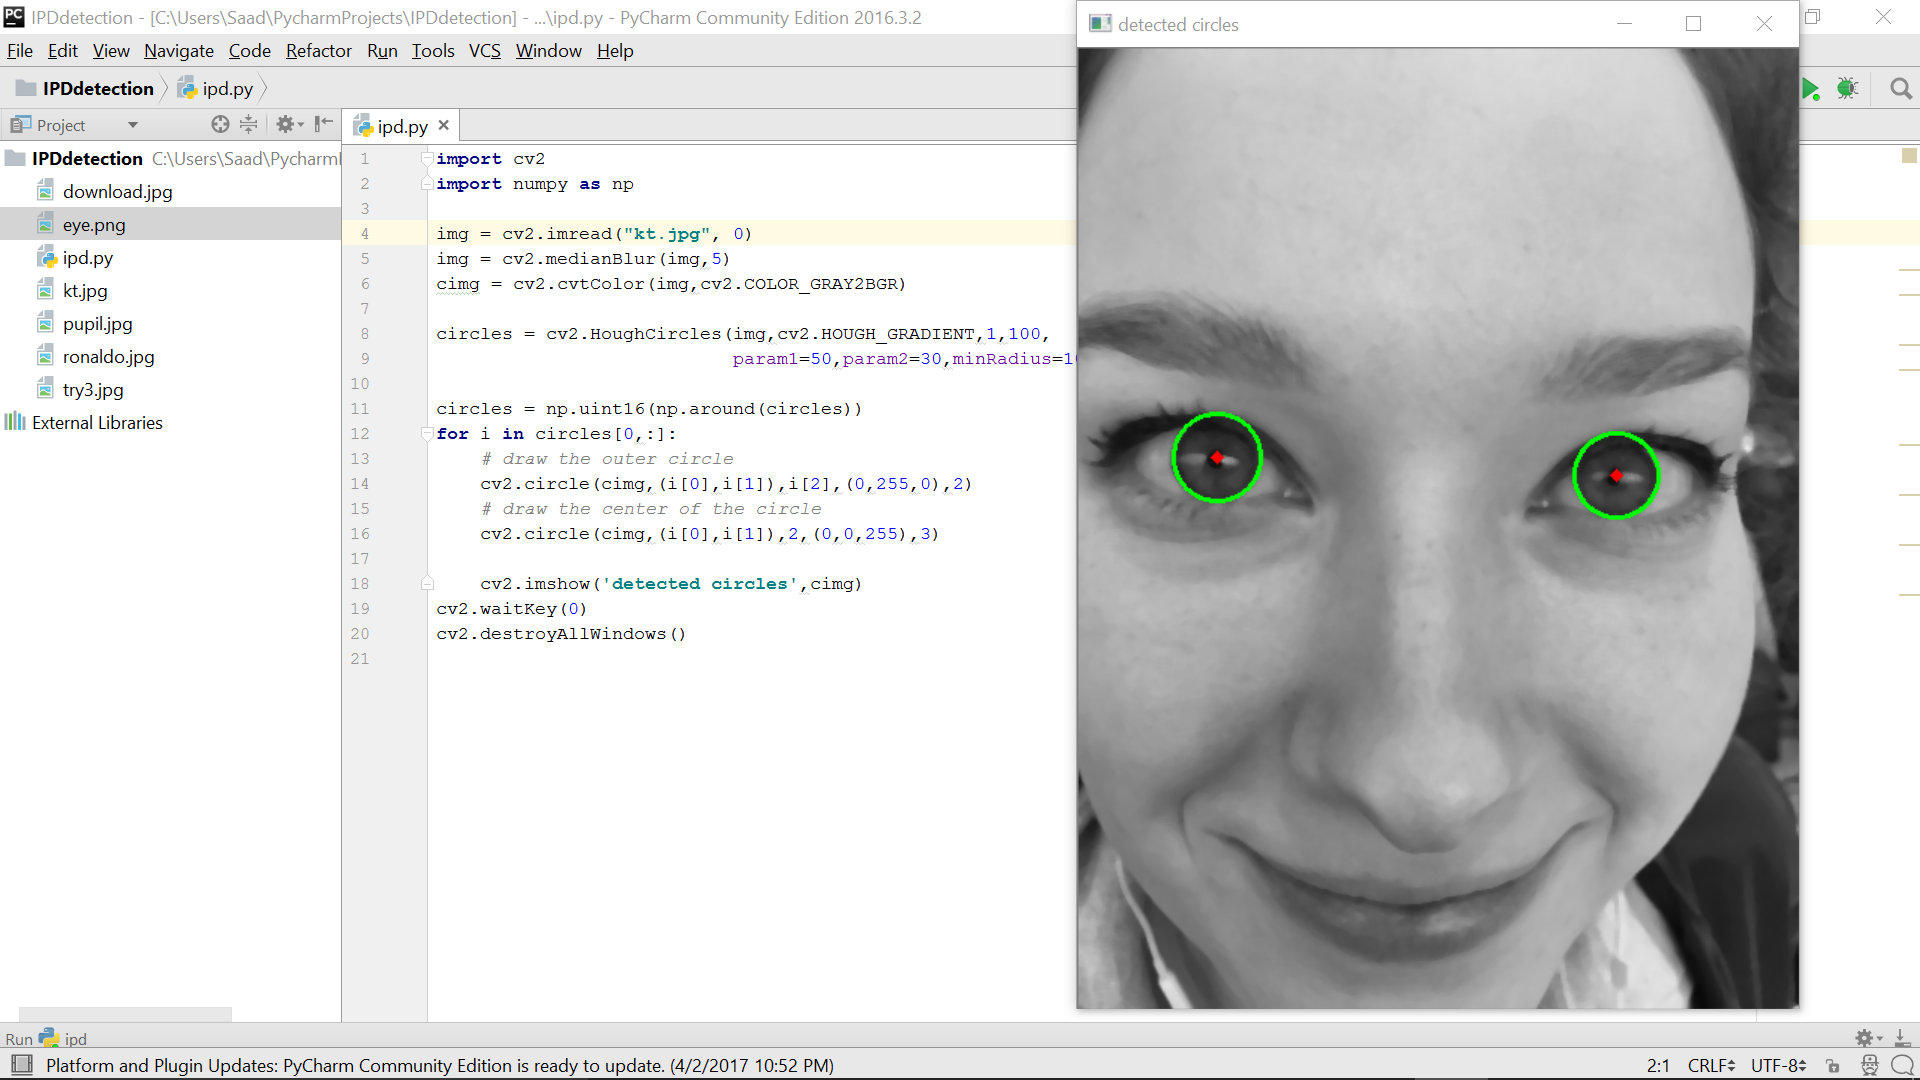
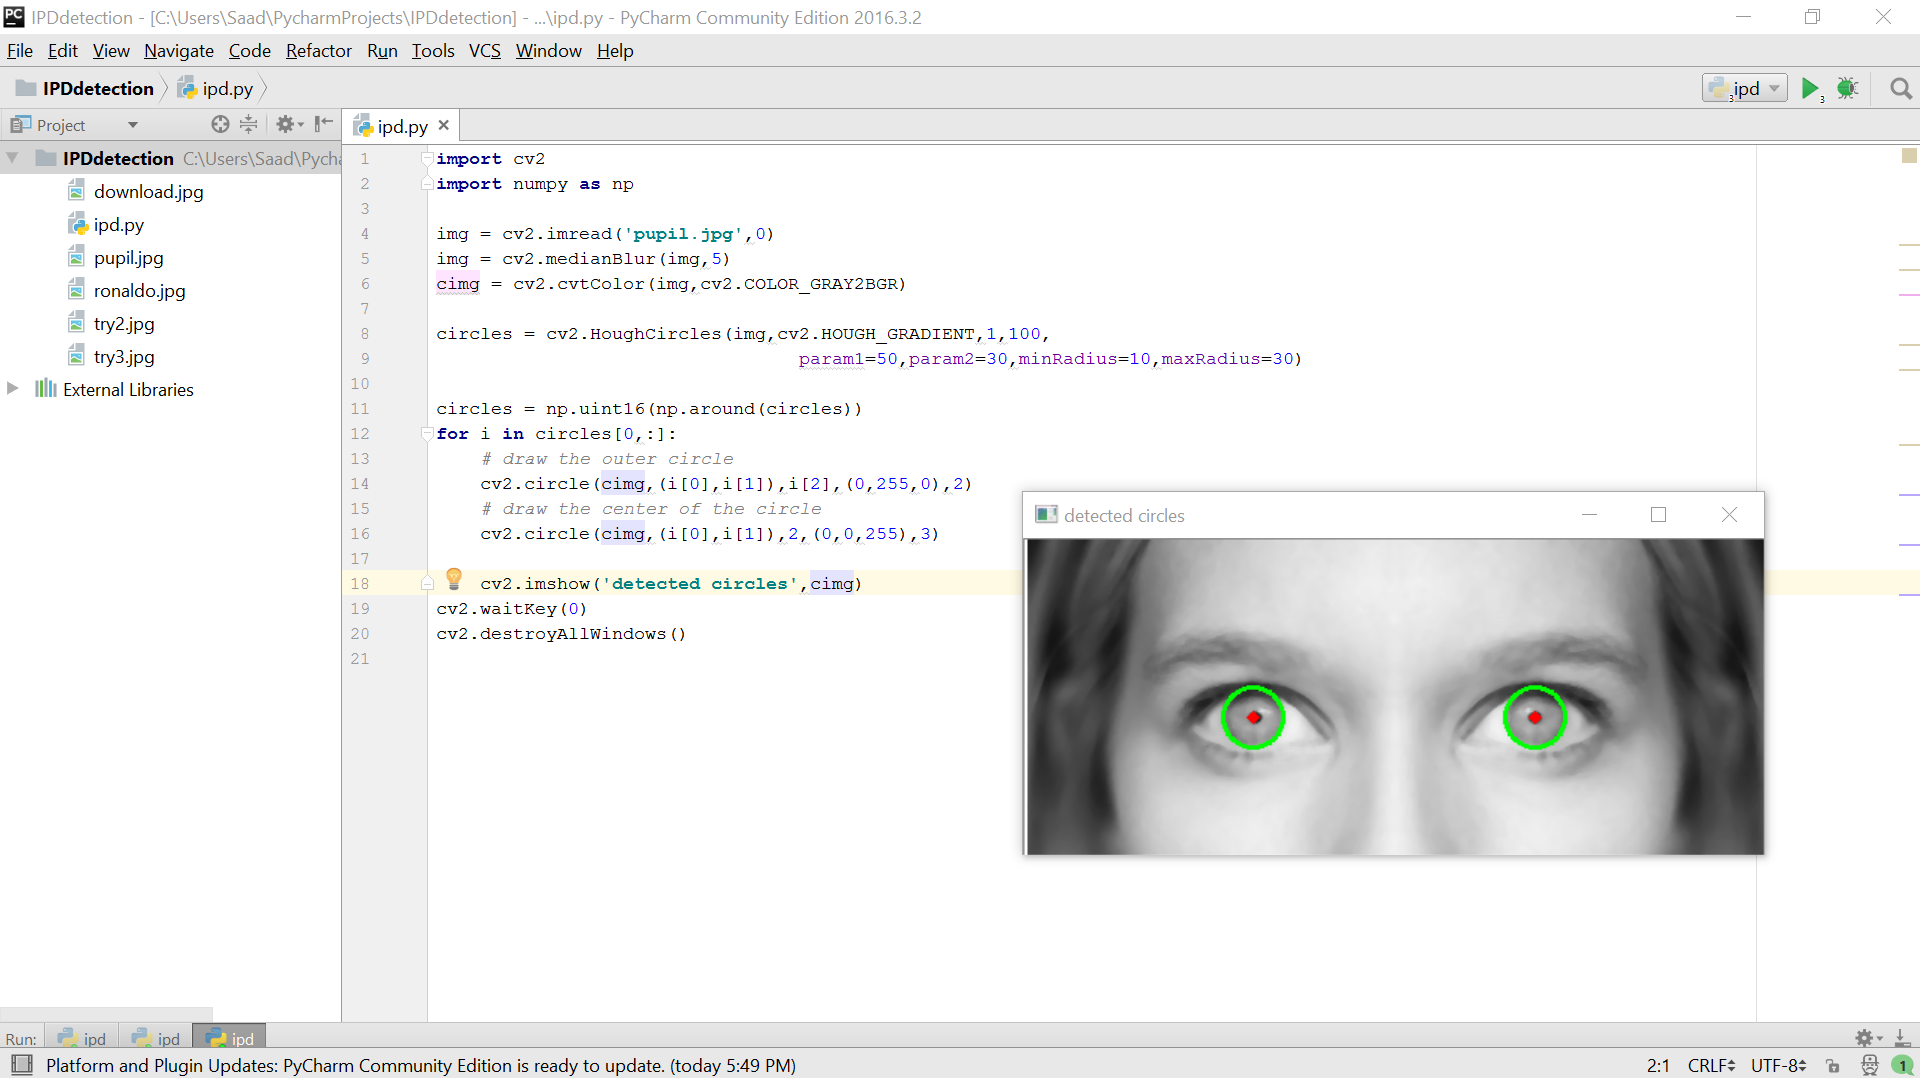
img = cv2.imread("test.jpg", 0)
img = cv2.medianBlur(img,5)
cimg = cv2.cvtColor(img,cv2.COLOR_GRAY2BGR)

cv2.namedWindow("Display", flags= cv2.WINDOW_AUTOSIZE)

circles = cv2.HoughCircles(img,cv2.HOUGH_GRADIENT,1,100,
                           param1=50,param2=25,minRadius=10,maxRadius=30)

circles = np.uint16(np.around(circles))

#coordinates of pupils
point1x = 0.0
point1y = 0.0
point2x = 0.0
point2y = 0.0

#coordinates of object on forehead
leftpointx = 0
leftpointy = 0
rightpointx = 0
rightpointy = 0

#coordinates of pupils in case hough circles doesn't work
leftpointx2 = 0
leftpointy2 = 0
rightpointx2 = 0
rightpointy2 = 0

objectexist = 0

m = 0
k = 0

dist = 0 #distance of pupils in pixels
dist2 = 0 #distance of object in pixels

mm = 100 #distance of object in mm


n = 1


for i in circles[0,:]:
    # draw the outer circle

    cv2.circle(cimg,(i[0],i[1]),i[2],(0,255,0),2)
    # draw the center of the circle
    cv2.circle(cimg,(i[0],i[1]),2,(0,0,255),3)
    if n == 1:
        n = 2
        point1x = float(i[0])
        point1y = float(i[1])
    elif n==2 :
        point2x = float(i[0])
        point2y = float(i[1])

    #print(" " + point1x + ", " + point1y + ", " + point2x + ", " + point2y)

print(point1x)
print(point1y)
print(point2x)
print(point2y)


dist = math.hypot(point2x - point1x, point2y - point1y) #ipd in pixels

#if dist < 10000:
print(dist)


def my_mouse_callback(event, x, y, flags, param):
    global m
    global k
    global leftpointx
    global leftpointy
    global rightpointx
    global rightpointy

    global leftpointx2
    global leftpointy2
    global rightpointx2
    global rightpointy2

    global objectexist

    global dist
    global dist2
    if event==cv2.EVENT_LBUTTONDBLCLK:
        m = m+1

        #print(x)
        if m == 1:
            leftpointx = x
            leftpointy = y
        elif m == 2:
            rightpointx = x
            rightpointy = y
            dist2 = math.hypot(rightpointx - leftpointx, rightpointy - leftpointy)
            print( "object distance = " + str(dist2))

            if dist < 10000:
                distanceInMM = dist * (mm / dist2)  # ipd in mm
                print( "IPD in mm = " + str(distanceInMM))
    if dist > 10000:
        if event==cv2.EVENT_RBUTTONDBLCLK: #used if hough circles doesn't work
            k = k+1
            if dist2 == 0:
                dist2 == 500

            #print(x)
            if k == 1:
                leftpointx2 = x
                leftpointy2 = y
            elif k == 2:
                rightpointx2 = x
                rightpointy2 = y
                dist = math.hypot(rightpointx2 - leftpointx2, rightpointy2 - leftpointy2)
                print("IPD in pixels = " + str(dist))

                distanceInMM = dist * (mm / dist2)  # ipd in mm
                print( "IPD in mm = " + str(distanceInMM))

cv2.setMouseCallback("Display",my_mouse_callback,cimg)


while(1):
    cv2.imshow("Display",cimg)

    if dist2 == 0 and dist < 10000:
        c = cv2.waitKey(0)
        if c == 32: #spacebar
            dist2 = 500
            distanceInMM = dist * (mm / dist2)  # ipd in mm
            print("IPD in mm = " + str(distanceInMM))

    if cv2.waitKey(15)%0x100==27:break    # waiting for clicking escape key
cv2.destroyWindow("Display")


#cv2.imshow('detected circles',cimg)


#cv2.waitKey(0)
#cv2.destroyAllWindows()

In conclusion

1) Describe your final project. What have you accomplished over the course of the semester?

The goal of my final project was to create an IPD (inter-pupillary distance) calculator, i.e a program that detects and calculates the distance in millimeters between the two pupils of the subject / research participant. This is done through circle detection via Hough Circles, and some camera calibration (pixels to mm) through mouse input. I have accomplished this goal for the most part, with some non-major consistency issues.

Other accomplishments were learning how to use the OpenCV library (and coding libraries in general), and the language Python. I came into this project with negligible knowledge of python and its syntax/rules, and ending the semester I feel to have a much better grasp on the language. Finally, this was the first project that forced me to use and learn the command line, due to the nature of python.


2) Describe your overall feelings about the project. Are you happy, content, frustrated, etc with the results?

I am content with the results, though frustrated with some inconsistency. Some methods I used and small algorithms I wrote work for some images and don’t work / work somewhat inaccurately for other images. Overall I am glad to have taken this opportunity to participate in research and feel that I have learned a lot, not only about Python/OpenCV but about the Virtual Reality field in general.
One particularly satisfying thing is overcoming my fears of not finishing the project. When I started it, everything seemed so intimidating as I wasn’t familiar with a lot of the tools I was using, so it was an uphill struggle.

3) What were some of the largest hurdles you encountered over the semester and how did you approach these challenges.

As mentioned in answer 2 and in many of my blog posts, the biggest hurdle I encountered was inconsistent results. A temporary – although admittedly not great -solution I have used is to alter parameters in my methods used by image basis as needed.

Other big hurdles were finding and understanding documentation and applying them to my project. Most OpenCV resources available were for C++, and the ones I found for Python were often for Python 2 rather than 3. Similarly I often encountered issues adjusting my code as a lot of online assistance I found was in Python 2.

One scary hurdle involved having to urgently factory-reset my computer a few weeks ago after an onslaught of viruses and this forced me to reinstall OpenCV, numpy, PyCharm, and some other stuff. Fortunately, I had all my code backed up so none of that was lost.

4) If you had more time, what would you do next on your project?
I would keep working on trying to make it more consistent and trying out other methods to detect circles. Since I had issues with blob detection and chessboard pattern detection, I would spend more time trying to figure out why these wouldn’t work for me and how to get them to work. I would clean up the code to make it more efficient, make it more user-friendly, generalize the program more, potentially add a webcam feature, and if I wanted to go above and beyond if I had more time I would try to create a GUI for the project.

Final Week

Last week was spent trying different camera calibration methods. A few days were spent on the checkerboard method, a few more on sticky notes and other color detection. Many problems cropped up with both these methods. I couldn’t get the program to truly recognize the checkerboard, and the way my program is set up it was very difficult to get the blob detection up and running.

This week I tried the last resort clicking method which surely was the least problematic out of all the methods. Some annoying issues I ran into were:
1) finding reliable Python tutorials and documentation as most resources were only available for C++
2) once a python resource was found, it was version 2.7 rather than 3.6, so a lot of time was spent fixing up indentation and syntax issues

Once all that was figured out, I wrote a tiny simple algorithm to take in the first two mouse clicks and stop after the first two, and then find the distance between the two. I have also finished up with the pixel -> mm conversion math, all that needs to be done now is testing with a reliable piece of paper / sticky note etc. taped to the forehead. I will probably do that on Sunday and edit this post with results, along with adding the option for command line arguments for more generality.

The only final issue is consistency, as hough circles distance in pixels detection seems to work on only 50% of the images, and I have yet to find out a solution for the short-scalar overflow. It shouldn’t be occurring based on the method I’m using, not sure what’s wrong.

Week 11

It took some time to get it to work, but with trial and error and cutting out multiple combinations of checkerboards, I might have got OpenCV to detect the board. The problem was the pattern has to be larger than 2×2 (OpenCV detects only the inner circle and likes having a wide border, so in essence a 3×3 cutout would actually be detected as 2×2, however that works)

3×3 was the largest that I could get to fit on my forehead, so I decided to get a printout of a chessboard with smaller square sizes, and cut out a 5×5 piece to test it as 4×4 and this is the outcome:
checkerworks

I wrote an if statement that draws a pattern around the detected corners of the chessboard, and the screenshot appears to faintly show this, I couldn’t get the pattern to be colored to be more visible. Here’s the original image:lasttry

Or I might just be seeing things; it seems as though the closer I focus on the gray screenshot, I can see a pattern, but not further away. May just be an optical illusion and I’ll take a look at ret’s boolean value to know for sure.


However another problem that popped up with this specific input photo is overflow, which the command prompt shows in the screenshot. This leads me to get an inaccurate result for the pixels distance, despite it working for every other image. This is another hurdle that I spent time trying to fix but wasn’t able to.

For next I’ll try to get done with the process of getting the detected points of the chessboard to get the distance in pixels (minus the white border perhaps) for a conversion value, and then perhaps take another photo with the chessboard to get an accurate pixels distance, and then complete the calibration from there.

Week 10

This week, a chessboard pattern was printed out and tested with multiple pictures of my face and my roommate Julian’s face. OpenCV’s chessboard detector method wouldn’t quite work on us but the problem seems to be the size of the squares. For it to fit on the forehead, it had to be cut down to 3×2. However, OpenCV’s method detects the inner corners only which makes it 2×1, and requires at least 2×2. So I will spend more time trying to work with that and if it doesn’t work out I’ll try other calibration methods.

badtest

In this screenshot, the algorithm didn’t quite accurately detect my eyes but that was a rarity as it works with most other images:
julian

oktest

Applying the distance method to these photos, the result in pixels actually seems pretty accurate. The distance between the eyes turns out to be around half of the image’s width in pixels, more or less.

After some trial and error for finding the distance in pixel, a (potentially tentative) solution has been found. Actually, two different solutions were found which yielded me different results with the picture I was testing:distance

In this screenshot I used a method widely recommended by stackoverflow and other sources for finding the distance between two points, which can be seen in the code. To find the center of the two circles in the first place, a small and probably inefficient algorithm was used.

The current result from the image that I’m going to go with for now is 266.27 pixels.

The next task is to figure out the width in pixels of the image itself to determine whether this is a plausible solution, as the other solution I was getting was 92485 pixels.

Once that is figured out, I should very soon be able to begin with the cardboard detection and conversion values to find distance in mm. I will try to accomplish this with a picture of my own face.

Week 8

This week’s post won’t involve many useful screenshots as most my time was spent
1) trying to get things to work
2) looking into how to calculate the IPD in pixels

This post comes a bit late as most of last Monday-Thursday was spent a bit scattered with a little lack of direction, with uncertainty of how the checkerboard pattern was supposed to be used. I tried reading through many, many tabs of documents and tutorials involving distance between objects in OpenCV but so far didn’t make much progress:

tabs

My meeting with Kevin Ponto and Alex Peer on Friday was pretty helpful for me to get back on track and have a better idea of what to do.

Since the meeting, a lot of my time has been consumed trying to get the Hough Circles method to work on a picture of my own face (so far I have been failing a lot, and haven’t yet been able to figure out why. Inputting an image of my face doesn’t even output the image when I run the program). So instead I tried taking a picture of my friend’s eyes, who has much more defined irises and pupils and the method worked on her:

kt

As work is ongoing, I will keep trying to get a picture of my face working, in prep for the final step of the camera calibration with the checkerboard. In the meantime, the immediate goal is to figure out how to get the IPD in pixels. I have a good idea of the formula and math to be used, although I am still digging for documentation and tutorials to get the location/coordinates of the centers of the circles in the image.

Weeks 6&7

These two weeks, a lot of time was spent debugging and working on both photos and webcam (although photos will be focused on from now on).

A lot of time was spent on getting to detect the face and eyes via Haar Cascades. This was accomplished relatively easily for photos with the help of the openly available tutorial, though there was a little hiccup where the program wouldn’t run at all. There was some trouble with the Haar Cascade parameters and learning how to integrate the xml files as the tutorial was based on a different version of OpenCV than I am currently using, but with some digging I was able to find a solution:

haar

After this I tried applying the same method for the webcam by changing some lines of code around with the help of the OpenCV webcam tutorial, and spent a few hours trying to get that to work but wasn’t able to. I followed the steps at https://realpython.com/blog/python/face-detection-in-python-using-a-webcam/ with some changes (I changed the part where the code uses system arguments because I wasn’t using any) but I still struggled to get it to work. Then I came across another helpful resource in https://pythonprogramming.net/haar-cascade-face-eye-detection-python-opencv-tutorial/ and was able to get the face+eye detection working with the webcam, after adding the full paths to the xml files for the cascade parameters (apparently an older version of OpenCV didn’t need the full path)

I still felt like I wasn’t making much progress and all my time and effort was scattered in multiple places so I decided to try and focus on pupil detection for pictures, which I was struggling with using blob detection, so I looked into some other methods and Hough Circles worked out pretty well for me through the tutorials at http://docs.opencv.org/3.1.0/da/d53/tutorial_py_houghcircles.html and of course, changing the parameters around to accommodate for the objects we care about. (is hough circles a viable alternative?)

Using Hough Circles on the Ronaldo photo wasn’t getting me anywhere but soon it was pretty clear to me that the photo wasn’t zoomed in enough and the pupils weren’t visible at all so now I’m trying the method on other eye-focused pictures and that helped a lot:

working

If I use Haar Cascades, I am already able to detect the eyes which is the area we care about but the challenge there is that I’m not familiar with the concept of how to work with only the detected space (there is a square drawn around both eyes, and I’m not sure how I would go about using only that space and working with it to get to the pupils)

The goal for next week is to integrate the checkerboard pattern and starting to get to the distance tracking, though right now I’m pretty clueless as to how I’m going to accomplish that.

Week 3

This week, I installed PyCharm and attempted to install all the necessary packages to it (nimpy and cv2). I tried to learn how to run a file remotely through the interpreter and how to organize my files in one location.

Currently I’m having trouble setting up my project in PyCharm (it won’t detect the necessary modules and I’ve been trying to figure out how to fix that)

sigh

EDIT: After spending some hours trying to figure out the issue, I found out that I had Python 2.7 installed from a while ago and that was getting mixed up with the 3.6 that I had installed recently, so that may have been causing PyCharm to not recognize the packages. I had the wrong interpreter selected in the IDE settings, so selecting the correct one fixed the issue!

yes!

In addition to that, I tested out cv2’s live video/webcam functionality in PyCharm and started working on face/eye/blob detection. I used the code from http://docs.opencv.org/3.0-beta/doc/py_tutorials/py_gui/py_video_display/py_video_display.html
and running the program correctly opened the laptop’s webcam (how cool) but I couldn’t get the window to close properly (it would keep reopening).


Now that I actually have some foundation and idea of what’s going on, the plan for next week is what the initial plan was for this week – to actually start playing with blob and face detection from pictures and live webcam.


Week 2

This week, I had to make some adjustments to my goals for multiple reasons – first being that this was another one of my pretty heavy workload weeks with regards to classes. This shouldn’t be an issue from now on as I have dropped a class to be able to devote more time to this project (and because of other issues).

Secondly, after doing some exploring with OpenCV and Python, it quickly become apparent to me that because of my minimal exposure to the language, I had some trouble understanding syntax and concepts so I took a step back and spent some time refreshing myself on the language to try to get a better foundation in order to be better prepared for the later stages. I did this through some lessons on CodeAcademy and skimming through some the Python Tutorials playlist by Youtuber thenewboston: https://www.youtube.com/playlist?list=PL6gx4Cwl9DGAcbMi1sH6oAMk4JHw91mC_

I highly recommend this channel for learning new technologies, it is my go-to.

Another issue I ran into and am currently trying to figure out is the type of coding environment I should use. I am unsure of whether to code directly in the Python interpreter and run it through that, or whether I should download an editor like Komodo to organize the file better in the case that there would be many, many lines of code involved. I am leaning towards either that or SublimeText, and teaching myself how to run these files through the command line. (I am already used to Eclipse and IntelliJ so I think it would be a nice transition to a Python editor rather than trying to code directly in the command line). A useful resource I found to get myself familiar with these basics of Python programming is the following: https://opentechschool.github.io/python-beginners/en/getting_started.html

Finally, speaking of the command line, I thought it might be a good idea to set up a Github repository for the project to have it all in one place and periodically update my code. That will be located at the following: https://github.com/saadbadger/IPD-Detection