Getting familiar with Tango

Hello everyone,

My name is Sizhuo. I am a first-year PhD student in Department of Computer Sciences. I started working with Prof. Ponto from this month. I am currently working on Tango (https://www.google.com/atap/project-tango/), and hopefully the Tango tablet will offer a new way to explore the point clouds in the visHOME project.

This week I went through the documents on the Tango’s webpage. I ran some sample code and learned how to use Tango API. There are three parts in the API: Motion Tracking, Area Learning and Depth Perception. The Motion Tracking API is quite easy to use. Basically there are three steps:

  • Set up a Tango service.
  • Register a listener to Tango events.
  • In the callback function, you can get the pose change represented as a translation vector and a quaternion. Then you can do whatever you want.

Tango will run as a back-end service and handle everything for you. Additional care may be needed, such as pause Tango service when the user switch to another app, or attempt to recover when the tracking quality is low.

Now I’m trying to build a graphical demo to see if I can match the pose change of the Tango tablet to the pose change of the virtual camera. After that I can move on to work with some real-world data.

I used to think that Motion Tracking is the only part that I need to use. Later I learned from the documents that Area Learning may also be helpful, since it can keep a memory of the environment to improve the tracking quality, of course at the cost of more processing resources. I would build the demo first and then see if this is needed.

Update – 4/20

Progress is continuing on all of the looks.  Unfortunately it’s still mostly back-end technical work, so there’s not much actual product to show yet.

1) Speaker coat:

I finally sourced and purchased the fabric for both the coat and the jumpsuit that will be worn underneath.  I patterned and fit the coat this weekend and things are looking good.

I did some additional research in ways to make the speakers louder and more efficient to produce.  While the embroidery technique on the test speaker was successful, it was time consuming to produce and I’m not in love with the visual outcome.  While researching alternatives, I stumbled upon this article about electroplating directly onto fabric.  I happen to have a friend in the Metals department who does a lot of work with copper electroplating, so I contacted her.  After negotiating with the head of the Metals department, I got permission to try it out.

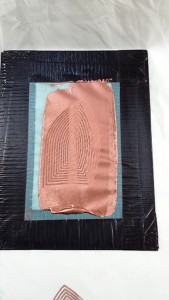
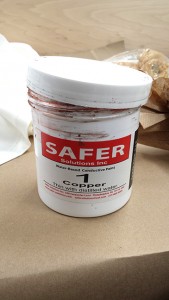
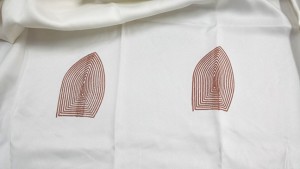
I designed a spiral in Illustrator that I used to make a thermofax screen.  I then screenprinted the spiral onto polyester fabric, using a conductive copper paint.
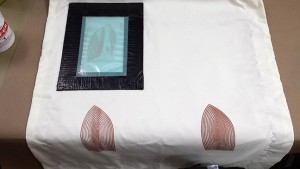
speaker2 speaker3screenpaintspeaker1One dry, the prints were wired to copper “trees”.  These will help keep the fabric stable in the electroforming bath, as well as conducting electricity directly to the print.
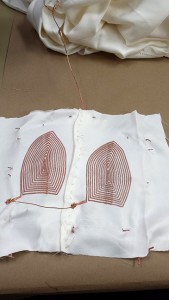
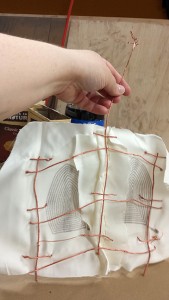
speaker5 speaker6The fabric is in the bath as we speak and I’ll be picking them up in the morning.  I’m hopeful that this method will give me a better outcome overall.

2) Inflatable dress

Not much progress here, as I’m still waiting for my solenoid valve to arrive.  According to my tracking number, it should be here by the end of the week.  Once it arrives I anticipate this look going together fairly quickly.

3) LightPrint top

I’ve been struggling with the components on this one.  I wired up a test circuit, using the FadeCandy interface and the WS2811 chips to power my LEDs.  Despite following the datasheet wiring instructions and triple-checking my wiring, I can only get the first LED in the series to light up.  I verified that the testing script should light the entire series by using it on an addressable LED strip and checked that the chips were all good by swapping them in the series.  I’m going to run the setup by a couple of people this week to see if we can suss out the problem.  As a backup, I ordered an addressable LED strip from Adafruit that has 144 LEDs per meter.  While the SMD5050 LEDs on the strip aren’t as bright as I would like, the sheer volume should get the point across.  Plus, I know the strip will work right off the bat.

After an epic battle with Rhino, I finally completed the design for the neckpiece.
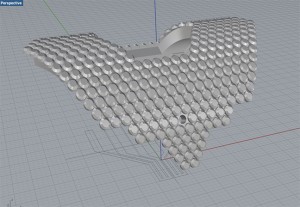
LPneckThe design was developed from the shape of the PIR sensor.  The hole at the center front allows the sensor to drop seamlessly into the design.  The neckpiece is designed to contain all of the electronics, as well as helping direct the lighting between the outer fabric and the reflective under fabric.  The challenge now is finding a place to print this.  Obviously, it’s huge.  Shapeways quoted $400 for the front half.  I’m looking into printing options on campus to see what’s possible.  If none of those pan out, I’ll look into either finding a way of reducing the Shapeways cost or dividing it up into pieces small enough for my printer.  More to come on this…

4) Hoodie sweater:

I commandeered one of the newly-donated knitting machines and set it up in my studio for my personal use.  While in generally great condition, I quickly found that a part needed to be replaced.  That replacement came today and I sat down to do my swatch knitting…only to discover that a wheel in the carriage is sticking.  I’m researching the problem tonight and will hopefully be up and running tomorrow.

5)  Spine top:

Last week I finally printed my sample spine, attached it to fabric and tested it with some muscle wire.  It was a complete flop.  The muscle wire barely made the spine twitch and the heat running through it scorched the fabric.  I started researching other options, such as micro stepper motors or linear actuators.  I hit the jackpot when I found MigaMotors.  They make a muscle-wire-powered linear actuator that is silent, approximately the size and thickness of a credit card and can generate 4.5 pounds of pulling force.  Plus it’s designed for use with Arduino!  I have 10(!!!) of these little guys in the mail to me as we speak.

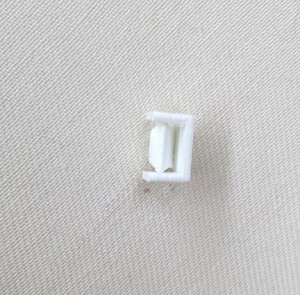
With the new power source, I also redesigned the spines.  The new version inserts directly through the fabric and clips into a base that allows it to swivel.  The bases will glue to a thin plastic strip, which will connect to the linear actuator.  When the actuators pull the strips, all of the spines will pop up.  I also tweaked the design so that they would layer better and to fit the angular aesthetic of the rest of the collection.
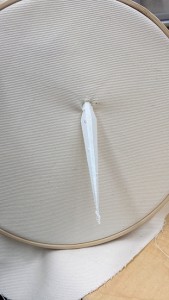
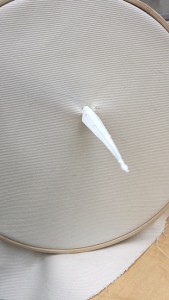
spine1 spine2 spine3

Since I’m going to need a couple hundred of these, the plan is to get a good, clean set 3D printed, then make a mold and cast them in batches.  The connectors are super quick, so I’ll just print those.

Miscellaneous:

It hit me the other day that there are a bunch of small details I still need to coordinate…

1) Invites/announcement cards (already ordered and should be done in a day or two)

2) Exhibition signage.  (The wall doesn’t lend itself to the usual vinyl, so I’m considering lasercutting the letters out of black acrylic)

3) Shoes and accessories (need to work on this)

4) Painting my mannequins (I have access to a paint sprayer, I just need to choose a color and buy the paint)

Final Stretch

I can’t believe we are at this point in the semester. Everything is moving at mach speed and just as quickly my energy seems to be fleeting away from me! But it’s the last stretch, the final length, and I’m going to tap into my horse power to get me through.

What have I been up to. This past week has been a roller coaster really. Euphoric highs and devastating lows. After many trips back and forth to Beloit, WI (not a great town), I got the leather bags back and they are much closer to where I need them to be. Not by any means perfect prototypes, which I wanted, but they also won’t be an embarrassment on the runway, so that’s progress. I had a photo shoot with my model Oliver Whiting and photographer Elizabeth Wadium. I made three more looks for the collection (total of nine for those counting) and we got some really gorgeous product shots of the bags.

Met with my video producer to finalize the shots that will be in the video. Had several meeting with my graphic designer, Michael Doyle Olson, and am really happy about the progress of the look book. It’s completely gorgeous. Very happy.

Bit of a delay in the video progress, not sure why exactly, I’m guessing Aaron has a lot on his plate. My composer backed out, today, so as of this moment I have a silent film, very 1920s of me. So I’m trying to figure that one out.

I’ve been working on the costume for Hybrid Salon for the Hair Affair, should be able to drop that off tonight and be done with it. Thank goodness. Tea-dyed the straight jacket today. Will do a little more distressing on that and it should be good to go.

Ordered my prints for the install. Got barn wood from Holly Easland for the gallery, and need to go to Full Compass to get another media clamp, hook, thing. (I’m techy)

Yeah, lots going on. Lots and lots. Trying to keep my head above water.


Optimization Project and Continuing Work on Pilot Codebase

I’m looking into wedging some lab work into my optimization class project; it seems like I’ll get something together, but I’m not quite sure what yet.  The full problem may be too large a space, but we may end up with the ability to describe limits given some set of points, or evaluate the quality of some candidate correspondences, etc.  I’m fairly sure I can solve at least the simple base-case version; I suspect I’ll need something more complex for the project itself.

Work also continues on the pilot code.  I worry I’m getting bogged down in development niceties; while it would be nice to have pretty code I can use quickly in the future, even an ugly pilot gives data.

I’ll dust off some old Ogre code and see if it can quickly adapted to this  pilot.  If so, the pretty code can be worked on in parallel with running the pilot.

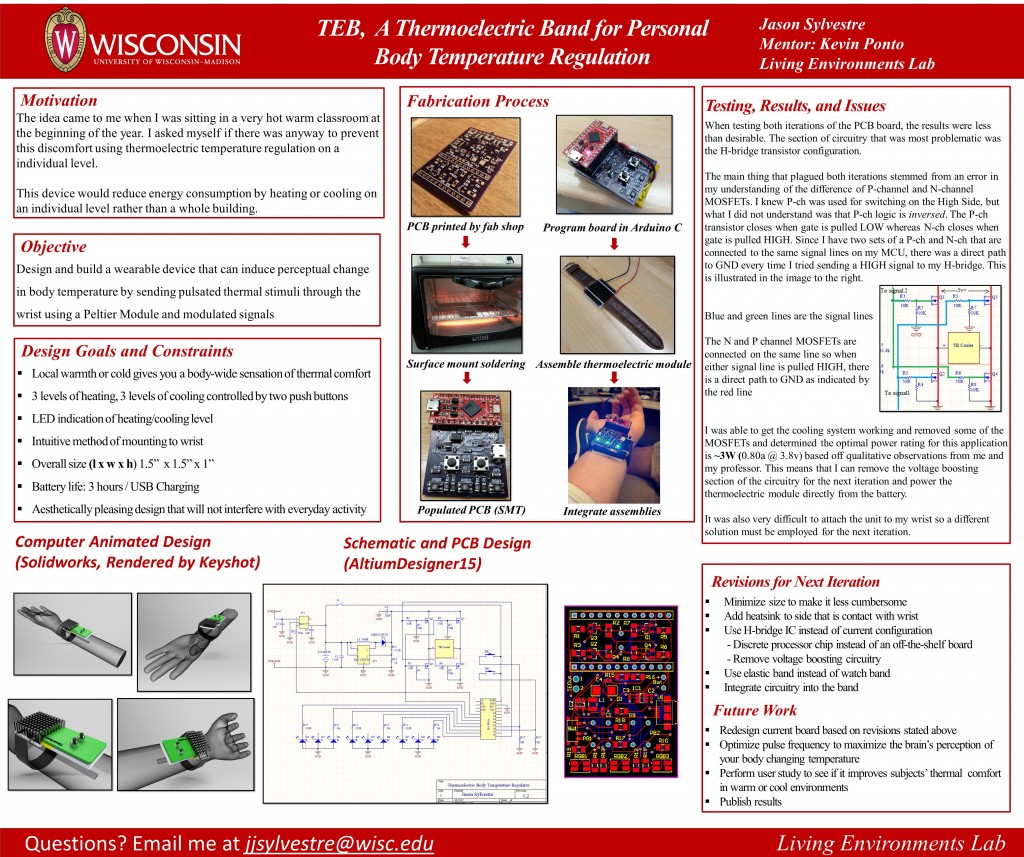
4/19/2015 TEB Update

Last week, I presented my project at the Undergraduate Research Symposium marking the culmination of my work to this date. Unfortunately, it didn’t quite reach my expectations as I had very little traffic in regards to actually presenting my research to someone who is not familiar with it, which is too bad because the two people I did present to were very impressed with how it turned out.

I was able to get a functional prototyping working last week, which was very exciting. You can actually feel your wrist picking up the pulses of thermal stimuli from the cooler and it tricks you into thinking your body is cooler!  I was using during the Symposium because it was quite warm in that room and I was able to use TEB to achieve thermal comfort. I must say that I was surprised with how well it worked.

Undergrad Research symposium jpg

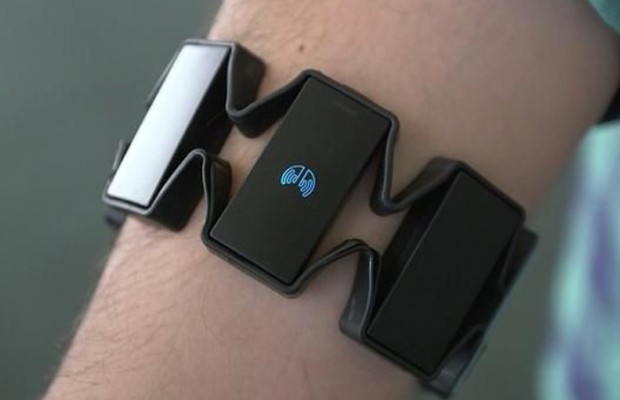
Now, onto the future of this project. The next step in this project will be to do a complete redesign of both the circuit and the physical bracelet. As I stated in the previous post, in this next iteration of the electrical design, I will remove the transistor configuration and replace it with a H-Bridge IC and I can remove the voltage boosting section of the circuitry. This will drastically reduce the size. Then I plan to change the wrist strap to make it less cumbersome to put on. The goal would be to have it closely resemble a Myo armband in terms of esthetics and size like the one in the image below.

http://cdn.techfrag.com/wp-content/uploads/2014/07/myo-armband-620x400.jpg

http://cdn.techfrag.com/wp-content/uploads/2014/07/myo-armband-620×400.jpg

4/10/2015 TEB Update

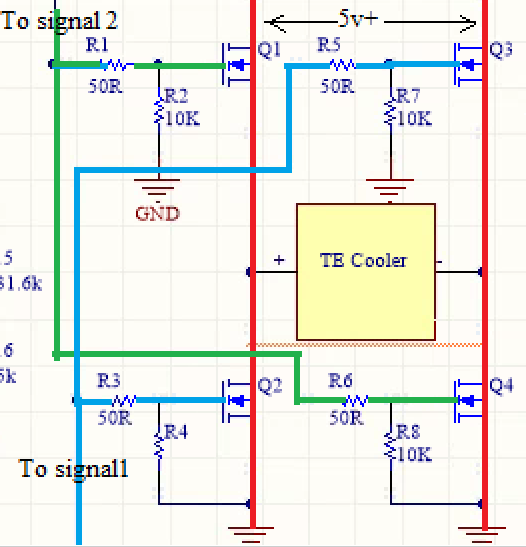
There is quite a lot of progress that has happened since my last post, but I’m going to start with the most significant breakthrough I had.  I found the source of all my problems and it stemmed from my lack of understanding of the difference between N-channel and P-channel MOSFETs. I understood that P-channel MOSFETs were used to switch HIGH side voltages, but I did not understand that the logic was the inverse to N-ch MOSFETs! What this means is that I did not know that in order to close P-ch MOSFETs, you need to pull the Gate voltage LOW. I’ve used N-ch MOSFETs in my day so, intuitively, I  thought P-ch was turned on the same way as N-ch; pull the Gate HIGH.  Boy, was I wrong. So now onto what this means for my application. I have the gates of my N-ch and P-ch MOSFETs connected (HeatPulse and ColdPulse) so when HeatPulse is set to HIGH, there is a direct short to GND because the other P-ch remains closed since the gate is being pulled LOW by a pulldown resistor. This is shown below

H-Bridge issues

There are a few solutions to this. One would be to implement an inverter between the MCU and the P-ch MOSFETs to invert the signal. The better solution I see though to purchase an H-bridge IC. This would eliminate many problems.

I also tested the thermoelectric module at different Power values to see how pronounced the temperature differential was. It turns ou that @3.8v and 800ma, the temp gradient is more than substantial for this application. This means I can remove the voltage boosting circuitry for the next iteration of the PCB. Currently, I have bridged the batttery voltage directly to the source of the transistors.

And then also for the next iteration, I’m looking to change the form factor of the PCB so that it is integrated into the wrist strap. Right now, it’s too bulky and cumbersome so I plan make it thinner as well.


Next Week’s Work

For the symposium, I plan to just present the cooling feature with the voltage supplied either from a transformer connected to a wall outlet or the Lithium Ion battery. I need to remove the P-channel transistor and connected the voltage input of the thermoelectric module directly to Vsource. I need to consolidate the PCB, TE Module, heatsink, wrist strap, and battery into a single unit. Then I’ll play around with timing to get the optimal frequency of sending pulses.

Things are moving at mach speed

Last week I took advantage of the “break” and did some initial troubleshooting of tech needs for the exhibition. The good news is there is plenty of throw distance for the projections, the less good news is that we don’t have high definition projectors available, so the image quality won’t be what it could be, but we can optimize the video for the projectors we have so it will be as good as we can make it.

I contacted Fleet Farm to see if I can make a casting of their fiberglass horse from their tack section. Haven’t heard back, but I’m not counting on this as possibility. There is a statuary place in Oshkosh that might be a better route to go. I have permission to use the statue outside the Shoe Box, but that horse is rearing up, and for the exhibit I really just wanted one standing.

Working with a graphic designer on postcards, posters, and the look book. Got a quote from Park Printing for the look book, and it’s expensive, but fair. I’m going to max out a couple credit cards and make it happen.

Shot a fashion story for Jon magazine last weekend in Minneapolis. Jon is a mens lifestyle magazine out of London, so it’s huge publicity for me and my brand. Mostly shot wrestling gear, but also shot the last sweater for the Horse Power collection because it has a vintage varsity sweater style. Very excited to have the chance to work with Taylor O’Brien again, and my model and muse, Connor Haugen.

Picked up the Horween leather bags yesterday from the saddle shop and they were a WRECK. Absolutely not what I envisioned, poorly constructed, “jacked up” as they say. Took them to my shoe repair guy who referred me to his brother-in-law who makes gun cases and other leather goods. He’s basically taking them apart and putting them back together…a little smaller, but finished to the level I expected. Will probably cost an arm and a leg, but they were not only ugly, but unusable before, so I had to do what needed to be done. Everyone is responding to the designs, which is good. Learned a valuable lesson working with the tack shop. (a very expensive lesson)

So I need to push my photo shoot back to this weekend, and then hopefully we can turn around the photos really quickly to get them in the book. I have a meeting with my graphics guy on Thursday, a meeting with Video on Friday, Photo shoot Saturday.

Also working on a project for the Hair Affair with Lauren Smychek, so that’s an added dose of stress (and fun) on top of everything else.

I’ll post a pic from the JON shoot, but SHHHHHHHH it’s top secret. The spread will be in issue 9, for those interested. clydesdale_color

Comfort Zone Update: Spring Break edition

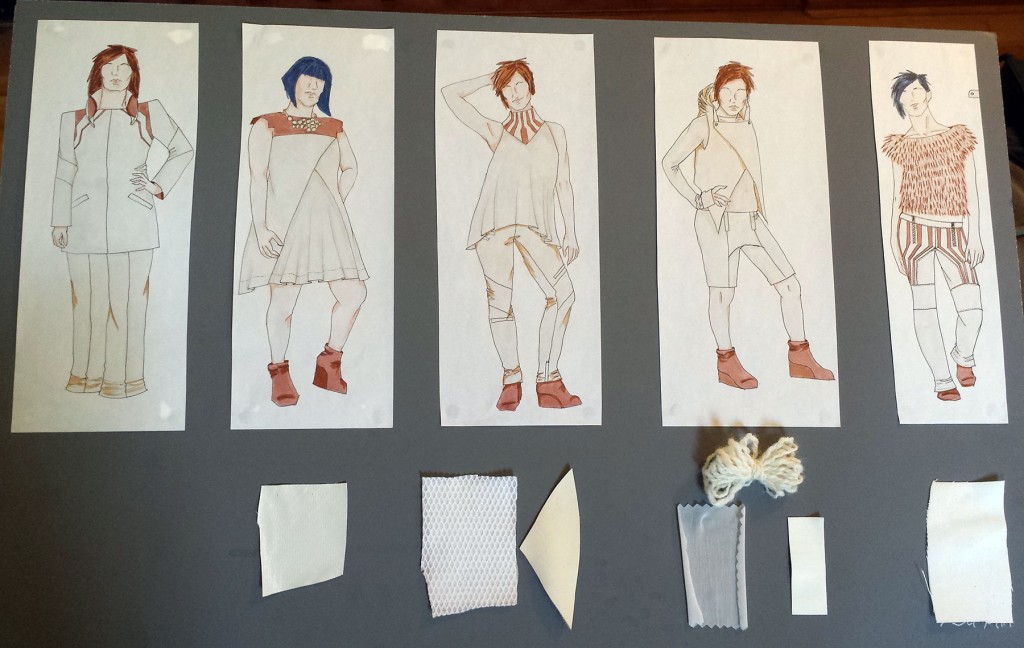
After a couple of weeks off due to a family medical crisis, I have a good bit of progress to report!  First, I finalized garment sketches and put all of my fabrics together to make sure I like how everything is working as a collection.  Here’s my current design board:

boardI thin it will be easiest to review where I’m at on each garment individually. Continue reading