3/24/2014 TEB Update

What I accomplished this week

The two main things I did this week was troubleshoot my circuit and I wrote up details of the test procedure that will occur.

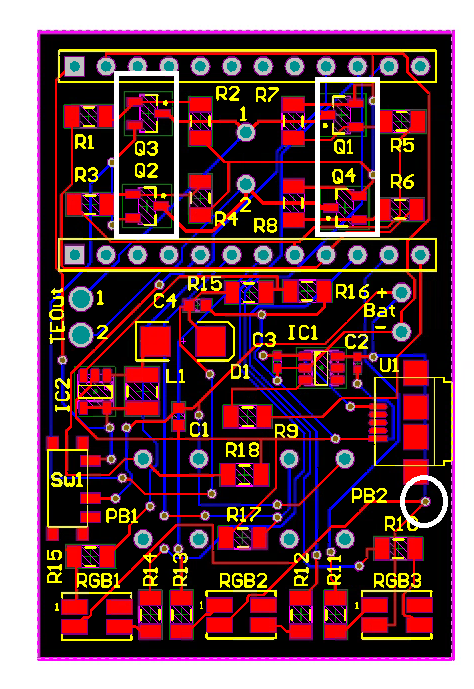
So, last week, I ran into an issue where the MCU would shut off when I added the DigitalWrite(HeatPulse, HIGH); or DigitalWrite(ColdPulse, HIGH); to my code. This sends a HIGH signal to the gate of the transistors that allow current to flow to the thermoelectric module.  For ‘HeatPulse’ the high voltage bus connects to the positive lead and then the low voltage bus is connected to ground.  When this occurs, heat is drawn from one side of the TE module to the other.  For ‘ColdPulse’, the polarity is reversed and causes heat to be transferred in the opposite direction. This system of transistors to enables a voltage to be applied across a load in either direction is called a H-Bridge.

As stated earlier, when I send a signal to trigger these MOSFETs, it shuts down the MCU. I measured the initial battery voltage and it was 3.7v and when the signal was sent, it was only 0.8v. So based on those observations, I reasoned that the large current draw from the thermoelectric module is causing the voltage to dip so I need to try a stronger power supply. Ross was kind enough to provide me with a computer power supply that had 3.3v, 5v, 9v, and 12v in abundance quantities, unlike my little battery. So I found the 3.3v line in the jumble of cables and desoldered my battery and soldered the power supply lines to my board. Unfortunately, the test results were less than desirable. The circuit board booted up and in less than five seconds, I noticed smoke coming from my board. It took me a bit to identify which component was burning up, but then I noticed the position of the inductor had shifted. Yes, the pads had heated up past the melting temperature of the solder. I fried the inductor in the voltage boosting sub-circuit.Inference: There is a short that appears only when either set of transistors’ paths

Unfortunately, the test results were less than desirable. The circuit board booted up and in less than five seconds, I noticed smoke coming from my board. It took me a bit to identify which component was burning up, but then I noticed the position of the inductor had shifted. Yes, the pads had heated up past the melting temperature of the solder. I fried the inductor in the voltage boosting sub-circuit.Inference: There is a short that appears only when either set of transistors’ paths

Inference: There is a short that appears only when either set of transistors’ paths are closed. This could be a design issue or fabrication issue (i.e. soldered incorrect component or accidental solder bridge, wouldn’t be the first time)

After hours of testing the circuit and analyzing schematics and analyzing PCB layouts, I have yet to determine the exact cause of the circuit though.

Next Week’s Work

I am going to discuss via email with Kevin Ponto who is currently in France for a VR conference and hopefully, we can diagnose the issue. If we cannot, then I am going to make a sacrifice and go with only cooling so I’ll have something presentable for the Undergraduate Research Symposium.

Still coding

Still building the base code. Rediscovering the joys of const correctness and circular inheritance. Should be done this week.

Also found something in the below papers I should look into later — they suggest that people perceive a “stable” scene even under varying “camera calibrations”. It looks like there may be a series of papers to chase down to get the full idea, but the gist (from the abstract of 2006):

“[…] observers are more willing to adjust their estimate of interocular separation or distance walked than to accept that the scene has changed in size.”

Which sounds like active stimulus overriding past experience. Which is maybe a constructive way to think about adaptability.


  1. Gilson, S. J., Fitzgibbon, A. W., & Glennerster, A. (2011). An automated calibration method for non-see-through head mounted displays. Journal of neuroscience methods, 199(2), 328-335.

  2. Glennerster, A., Tcheang, L., Gilson, S. J., Fitzgibbon, A. W., & Parker, A. J. (2006). Humans ignore motion and stereo cues in favor of a fictional stable world. Current Biology, 16(4), 428-432.

3/17/2015 TEB Update

What I accomplished this week

I spent this week testing and debugging my code. Unfortunately, I didn’t get as much as done as I would’ve liked to due to midterms.  I was able to manage to integrate the external interrupts into my code so now when I press  Pb+, it adds 1 to the counter and when I press Pb-, it subtracts 1. The processor determines the pulse frequency of the thermoelectric module depending on the value of the counter.  An issue I ran into was that the buttons were too responsive so when I pressed the pushbutton once, the processor registered it as me pressing it several times. To solve this, I need to add millis() to my code to delay it.

Next week’s work

It’s going to be a very busy three weeks leading up to the Undergraduate Research Symposium on April 16. Once I finish coding this I still need to perform a user study to get some test data from several human subjects in a controlled environment.  Next week, I would like to get my code working and write up a description of the details of the tests.

Building Code

I’m in the middle of building some c++ openGL foundational stuff. I expect it to be done in a week, week-and-a-half.

The goal is to have something lightweight for quick prototyping, without disrupting the lab’s main codebase. Exotic input (Leap, Kinect) and data (large pointclouds) may not make it into the initial version, but the goal is for clear paths to add them.

I also looked into:
– streaming from various mobile video sources: found some android source, vague indications RaspberryPi can be used with effort, but no clear guarantees of performance
– ways to rig passive steadycam / gimbals: found three main designs (an inverted “U”, gyroscope-style with a T-bar, and a “bow + pendulum”), but there are some questions as to where one wants the center of mass. It makes me want to rig simple simulations to decide if different designs do what we need.

I don’t have enough organized thoughts on these for a writeup here, but may dump some links into the google doc.

UW-Hoofers Riding Club

It has literally taken me three days to recover from the weekend, and not for any of the usual reasons. (haha) This past Saturday we shot the video for my thesis install of Horse Power. I couldn’t have asked for better weather, it was a bit chilly, but we had sun, and more importantly we had snow. Had I pushed the shoot back to this weekend, that would not have been the case. The shoot went amazingly well. The UW-Hoofers Riding Club was so accommodating. Whatever we needed they were right there to do.

“I think we need a gray horse for this shot.”

“Okay! I’ll be right back I just have to go run out in the pasture and catch one.”

“Could you take off all the blankets and halters and name plates from the stalls, we need less visual stimulation for this shot.”

“Sure, no problem!”

I don’t think I was too demanding, I’m not JLo, but they were so gracious, and sincerely happy to do whatever they could. I can’t say enough nice things about those girls.

I was able to collaborate with my friend Leah Lindsley, and amazing painter who I went to undergrad with, who now works in cosmetology. She did a beautiful job with hair and make up, not only for my two models, but also all five riders that we used for the night scene in the arena. The greatest thing about this collection continues to be the collaborations I’ve been able to set up. Aaron Granat, my videographer is a perfect example. Because he’s a lecturer he was able to borrow all of the equipment that we needed for the shoot from school. He rolled in with over 50k worth of lights, cameras, tripods, and rigs. It was incredible! He brought his own crew, and they were so amazing. Perfectionists, all three of them, which helped put my mind at ease so I could worry about the things that I needed to do, like creative direction, styling, catering, horse petting, etc.

We got tons of great footage outside in the morning, with the vistas up on the hill it looked like we were on top of the world. Absolutely incredible. After lunch we shot the fashion show through the barn. The lighting scenario in there was a little tricky because we had so much back light coming in from the barn door, but I ended up really liking how the models looked in silhouette, revealing the looks as they moved closer to camera. I think when we project them in the gallery and I turn my space into a never ending barn, the effect will be super cool.

By far the most chills-down-your-back/I-can’t-believe-this-is-real moment came at night when we moved into the indoor arena. The lighting in here was a real nightmare, they basically blew out the light they wanted to use because we didn’t have enough juice. We had planned to plug into the overhead arena lights, the only problem was in order to do that we needed to unplug all of them, which meant taking a very tall ladder around to each one and that just wasn’t going to happen. We ended up running an extension cord out to the center of the arena and covering it with a pvc pipe that the horses were used to running over in lessons and shows. (thank god) In the end we used two lights, and the effect was nothing short of magical. The scene is breathtakingly gorgeous with five mounted riders walking around the perimeter as model slowly emerges from darkness, once the model is passed their trail they break into a canter filling the frame with so much actual horse power it’s impossible not to get caught up in the moment. I’m so excited for this video to be edited and see how it looks projected large scale!

I’ve been waiting, for basically five years to work with my friend Taylor O’Brien. He and I went to Stout together and he has since become one of the most talented fashion photographers I know, and I’m putting him in the company of people like Steve Meisel and Terry Richardson. He is just so incredibly talented and the photos are better than I could ever have imagined. I will share one on here, which isn’t even edited, but the rest are top secret until I release them as the show approaches. I was so lucky to find two models not signed to an agency. I paid them in boots (Dr. Martin’s) that I am getting at wholesale price from The Shoe Box in Black Earth, WI. They made everything look good, but if I do say so myself, the clothes are pretty great. I’m very proud of this collection.

Okay, I have to go teach.


3/9/2015 TEB Update

What I accomplished this week

This week, I wrote the new code with the external interrupts implemented. If you read my post last week, you’ll know in the previous iteration, there was a large delay in program response when the buttons were pressed. The push buttons are now connected to the external interrupts on the AVR so this hardware solution should help eliminate the delay issues. For those of you who don’t know, external interrupts are a feature processors have to eliminate the slow timing of the polling process of I/O devices. The protocol usually is something like this

  1. The processor notices a state change on the interrupt pin.
  2. The main loop stops what its doing and saves its current state
  3. The Interrupt Service Routine (special kind of function) executes its code
  4. Data from the the ISR is transferred to the main loop using global variable
  5. Main loop starts where it left off with the data change

Of course, it is much more complicated than that on a hardware level, but that is the general idea

So I have my program set up where the push buttons are connected to the two external interrupts and then a push button counter that keeps track of which of the two push buttons have been pressed and how many time. The range is (-3, 3) with -3 being the coolest level and 3 being the warmest level so there are 3 cooling levels, 3 heating levels, and 0 is neutral (off).  I have two different ISRs, one to increase the value of the counter and the other to decrease it. And then there is the main loop, which sets the pulse frequency and LED level depending on the value of the counter.

I compiled the code and received no syntax errors.

Next week’s work

I would like to test the code on the board and fix any bugs with it. I am also going to meet with Professor Kevin Ponto to see if my code is as efficient and concise as it can possibly be.


3/2/2015 TEB Update

What I accomplished this week

All my time this week was spent solving the electrical issue that was causing a short circuit (actually very high resistance, but not infinite) which prevented the circuit from functioning properly.  After spending a few hours with Professor Kevin Ponto analyzing and testing different subsystems of the circuit, we identified that the issue was coming from the H-Bridge section of the circuitry. I checked my design twice and verified that there weren’t any problems with it. This meant that there was an error when populating the board.

What I found was that I mixed up the location of two transistors when populating the board. There was a P-channel where an N-channel was supposed to be and vice verse.   I then removed and swapped the transistors and sure enough, everything is working perfectly now.

See the image below for more details.

Next week’s work

I would like to finish writing and testing the code out on my board.  The reason I have to write new code for this iteration is because I modified the PCB design so that the buttons are now connected to the external interrupts on the microcontroller.  This should help eliminate the delay issues (when the buttons were pressed) I was having with my first iteration.

1_30_2015 PCB2 Analysis (3)

The transistors in the white boxes were the root of my issues. I had one N-channel and one P-channel in each box, this enabled current to flow directly from power to ground. Q2 and Q3 in the left box should be two P-channel transistors and Q1 and Q4 in the right box should be two N-channel transistors

Week 5

Last week got eaten by an unexpected job application opportunity, so there wasn’t as much progress on the show front as I planned.

I finished the collar assembly for the hooded sweater.  The retraction works great!  Unfortunately, my servos aren’t strong enough for the apparatus.  I’ve ordered some new servos that will be here tomorrow that have far greater holding torque.  They should fit into my existing framework pretty easily.  I also got my range sensors and am planning on testing them either today or tomorrow.

I draped/patterned the body of the sweater and knit up some swatches to figure out what would work best.  I found a great tuck pattern that will add a nice texture to the sweater and should be able to start knitting tomorrow.  I also finished patterning the shorts.  The plan right now is to have the outfit complete this week.

Oculus 0.4.3, 0.4.4 want you to draw a tiny rectangle

I found the bug. I’ll do a proper writeup in this space soon, but the gist is they do latency testing as part of the timewarp headpose prediction; they do this by drawing a rectangle of varying color in the upper right (out of user view).

Our code doesn’t do this, because it’s only present in some of the D3D-based example code (TinyWorld), not in the OpenGL-based documentation PDF.

I bet the other demo app code has some surprises lurking, as well.

More thorough writeup in this place, soon.