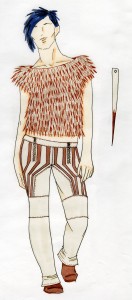
Crazy Horse…

This week I’ve been working on construction of the garments for the collection. I’m having fun figuring out how to make a motorcycle jacket. I’ve looked at some commercial patterns to get me started but ended up having to completely draft it from measurements. Not 100% satisfied with the results so far, but I’m getting there. I cranked through most of the pants/shorts for the collection, working on some drop crotch joggers which have also proven to be trickier than originally anticipated.

Went out to riding center with my videographer to see where we’re going to shoot, and what equipment we’ll need. It’s nice working with someone who knows what they’re doing because I was very distracted by cats and horses. I’m looking forward to creative directing the shoot and letting my collaborators do what they do. Waiting to hear back from hair and make-up people. It would be really nice to have someone out there both days, so I don’t have to worry about it. I met one horse I’ll be working with, Kobi, he’s black-bay Thoroughbred. Everyone at the Hoofers is really excited about the project, so it makes it fun.

I took on a side project with Hybrid Salon, doing the costume for the Hair Affair at MMoCA in April. I’m teaming up with Lauren Smyczek, an undergrad in our program to create the Houdini-inspired look. I’m hoping to have a little more time to work on that after the photo shoot on the 8th.

One of the sweaters is done. I’m very happy with it. The other is in production now, I won’t be knitting much, if any, of that one, but I feel like knitting the first one was enough of my hand in the process to feel good about them. The Alpaca yarn is incredibly warm and soft; the two things I like most about sweaters.

Still worried about the projections but figure I can make the video first and then decide how it needs to live in the gallery.

That’s been my week.

Week 5

Progress is being made on outfit #1.  I’ve ordered the leather for the pants and gotten yarn for the hoodie sweater.  I worked through how to assemble the support structure for the extendable hood.  I spent the weekend 3D printing a support base for the collar and motors to help everything stay stable.  The servo motors I purchased worked perfectly with the Adafruit motor shield.  They’re very tiny and quite strong, so I think they’ll work just fine.  Tomorrow I’m going to finish assembly and testing of the collar/hood support and drape the fabric portions of the sweater.  I’m also hoping to start machine knitting the fabric.

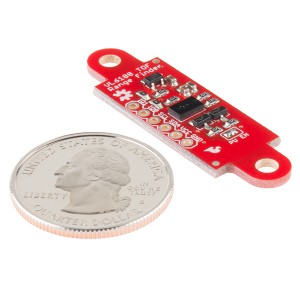
I’m beginning to get a little concerned about the viability of the capacitive sensing apparatus.  I’ve tried a variety of techniques (adding more resistance, adding a non-conductive layer to shield, applying smoothing to the sensor readings) and things still seem to be all over the board.  Also, I haven’t been able to get the range I want.  I’m going to run the mock-up past a couple of people this week, but if I can’t get a solid outcome I’m going to pursue plan B, namely a different sensor technology.  I’m considering this product from Sparkfun:

12785-02https://www.sparkfun.com/products/12785

It seems fairly straightforward to use with a decent range and very small package.  I want to make sure that I’m not wasting my time getting hung up on unproductive technology exploration instead of making progress.

I’ve been doing a good amount of research on the next outfit, which will be a dress that has a hem that inflates when triggered.  I’m researching materials and potential inflation methods now.

2/23/2015 TEB Update

What I accomplished this week

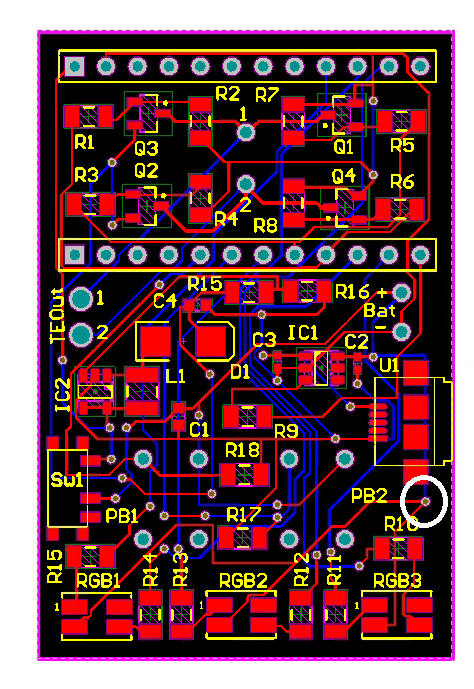
This last week, I was trying to identify where the problem was in my design that was causing the results that were outlined in the previous post. I thought I identified the problematic trace which is the one connected to the white circled via in the bottom right corner in the image below.

1_30_2015 PCB2 Analysis (1)

This is the trace that connects the common anode of the LEDS to the source voltage. The idea is that when you want to turn on one of the LEDs, you pull that signal pin LOW instead of HIGH and that will give the polarity needed to turn on the LED.  However, as you can see from the image, this trace is not routed through the main power switch on the left (Sw1).  I deduced that this was the reason why the LEDS are turned on even when the power switch is off. To reroute this without having to fabricate another board, I cut the trace and then placed a jumper between the circled via and the output of Sw1

Test, Observations, and Problems

Before rerouting the trace, I uploaded some code the microcontroller that told the LEDS to turn blue on startup. With the switch off, I supplied a voltage and the red LEDs illuminated just as before. When I pressed the buttons, the microcontroller powered up and the blue LEDs turned on so that was successful. So I then rerouted the trace with hope that would solve the problem of the red LEDS illuminating when the switch is off and it did, but then that lead to another problem. When the switch was off, everything was off, but when you turned the switch on, the power LED on the microcontroller flashed for a fraction of a second and then shut off.

Next Week’s Work

Next week, I’m going to compare my old schematic to the new one and then remove components one by one to identify which section of the board is causing the issue. I also need to submit my application to present at the Undergraduate Research Symposium.

Also, a message to all readers, if you see the problem with my circuit, comment!

Oculus lib wrapped; survey review forthcoming

Built the bulk of a simple wrapper for the Oculus lib. Should make debugging faster. Needs a review pass for general organization / naming if I want to share with others, and I’ve still some questions on what happens when attaching to a window — I don’t see how the weird 2×2 of possible rendering states (direct or extended, distortion via lib or in app) is selected for, or how to test which state their tool is requesting, or what params to pass to which function in which of the four possible states. The docs don’t seem to have answers; their code might, or some quick tests should elucidate. Also should do something with their tracking.

But the end result is a lib that bottles up all the Oculus stuff, allowing bugs to be tested in isolation, and hopefully protecting other code from future lib changes.

Also sifting through a survey paper. Not quite ready for a writeup, yet.

Initial Papers: Accommodation and Age

It seems to be well understood that accommodation declines with age, but I’d like a strong reference to cite, and a little better understanding of the how and why.

Still don’t have a ref I really like for citing. Mordi is maybe okay.

What I found:

When optometrists want a citation for this, it’s a set of slightly conflicting papers. They seem to agree on a range from 50-60 for end of decline … mostly.

The Mordi papers seems to be a good overview, though they’re maybe a bit strongly in favor of the Hess-Gullstrand (lens-centric) theory; they set the tone for my current understanding of things, so if they’ve a bias, I’ve probably inherited it. They cite at least one other paper they claim is a good overview.

Their take is that most conflicting results are due to small sample sizes and the general difficulty of isolating things for measurement (which might partly just be arguing for their larger sample size and chosen means of measure, but their arguments are plausible to my naiveté). For example, in their dynamics paper, they suggest there’s a linear area of response speed bookended by nonlinear (due to different biomechanics) , and many studies mix response in the linear and non-linear region; this skews results of participants with reduced accommodative range, where the nonlinear accounts for a larger relative portion of the total region. So, uh, things are fraught with complicated subtleties.

Seems most modern work is either deciding why static accommodation loss happens, or measuring dynamic aspects with some novel tech.

Loss is modeled either by the Hess-Gullstrand theory, which thinks it’s lenses, or the Duane-Fincham extra-lenticular theory, which perhaps focuses on the ciliary muscle, though I think it was Strenk that seemed to think muscles could cohabitate with Hess-Gullstrand. It’s surprising that things are still so foggy with so many years of study and methods of inquiry applied (Glasser takes lenses from cadavers and manipulates them in complete isolation; other studies use IR or lasers or ultrasound for high-frequency imaging of eyes in situ). Medical science sounds messy, on several levels.

Also there’s a Hung-Semmlow “model of accommodation”. (Ophthalmology is a land of hyphens.)

Also, “Duane’s curve” may be the standard against which amplitude of accommodation is compared, though it’s from 1912 and assumably based on subjective measures. ( Future reading?)

Other factors explored include increased pupillary response with age (contraction? enough to change observed luminance?), what sounds like an absence of small oscillations in steady-state focus, and changes to tonic accommodation.

I have a vague sense that it might be worth measuring tonic accommodation, but no concrete reason other than that it changes between individuals. Fairly sure other VR studies have done this, but I don’t remember any findings.

Also maybe worth investigating: Mordi claims the decline apparently extending to 60, instead of 50, years of age is due to a “depth-of-focus” contamination effect. Maybe important? They cite a paper.

  1. Glasser, A., & Campbell, M. C. W. (1998). Presbyopia and the optical changes in the human crystalline lens with age. Vision Research, 3816/S0042-6989(97)00102-8(2), 209–229. doi:10.10

  2. Heron, G., Charman, W. N., & Schor, C. M. (2001). Age changes in the interactions between the accommodation and vergence systems. Optometry and Vision Science : Official Publication of the American Academy of Optometry, 78(10), 754–762. doi:10.1097/00006324-200110000-00015

  3. Kasthurirangan, S., & Glasser, A. (2006). Age related changes in accommodative dynamics in humans. Vision Research, 46, 1507–1519. doi:10.1016/j.visres.2005.11.012

  4. Mordi, J. a., & Ciuffreda, K. J. (2004a). Static aspects of accommodation: Age and presbyopia. Vision Research, 44(February 1997), 591–601. doi:10.1016/j.visres.2003.07.014

  5. Mordi, J. a., & Ciuffreda, K. J. (2004b). Dynamic aspects of accommodation: Age and presbyopia. Vision Research, 44, 591–601. doi:10.1016/j.visres.2003.07.014

  6. Ramsdale, C., & Charman, W. N. (1989). A longitudinal study of the changes in the static accommodation response. Ophthalmic & Physiological Optics : The Journal of the British College of Ophthalmic Opticians (Optometrists), 9, 255–263.

  7. Schaeffel, F., Wilhelm, H., & Zrenner, E. (1993). Inter-individual variability in the dynamics of natural accommodation in humans: relation to age and refractive errors. The Journal of Physiology, 461, 301–320.

  8. Strenk, S. a, Semmlow, J. L., Strenk, L. M., Munoz, P., Gronlund-Jacob, J., & DeMarco, J. K. (1999). Age-related changes in human ciliary muscle and lens: a magnetic resonance imaging study. Investigative Ophthalmology & Visual Science, 40, 1162–1169.

2/15/2015 TEB Update

What I accomplished this week

Testing, Observations, and Problems from Initial Bootup

This week, I powered up the board for the first time and I got mixed results. There was no magic smoke like last time and I didn’t fry any components, however, the MCU to go into shutdown mode.  There is something else very strange that is going on.  When the power switch is turned off, the LEDs are very weakly illuminated and the microcontroller power LED is off.  When the push buttons are pressed, the LEDs turn off and the power LED of the MCU turns on.

When the power switch is turned, there is no response from any of the components on the board.

Next Week’s Work

Next week, I’m going take another closer look at my schematics and PCB design to see if I can identify the problem. Once I identify the problem, I will make the necessary hardware changes to ensure proper function and will update my PCB and schematic accordingly.

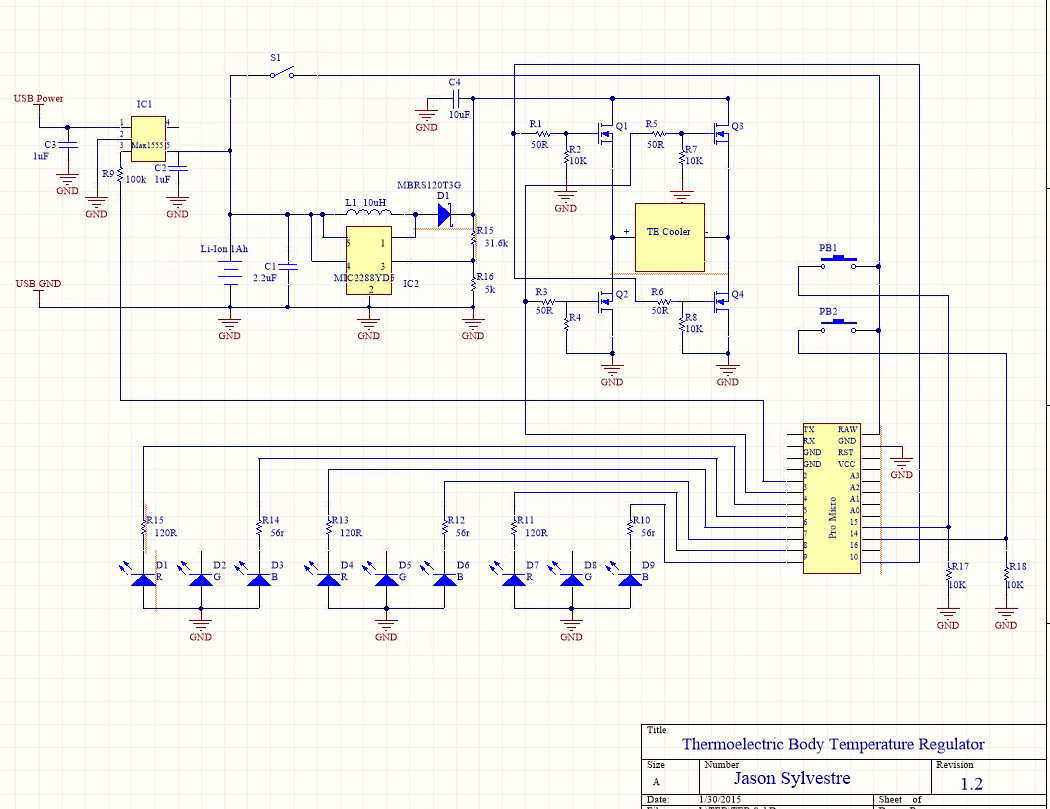
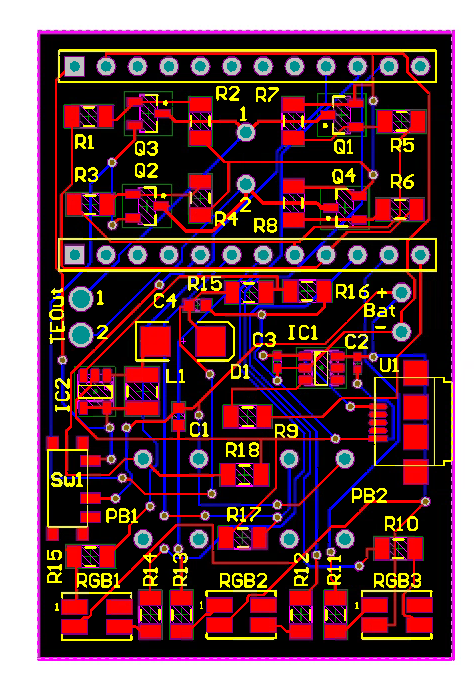
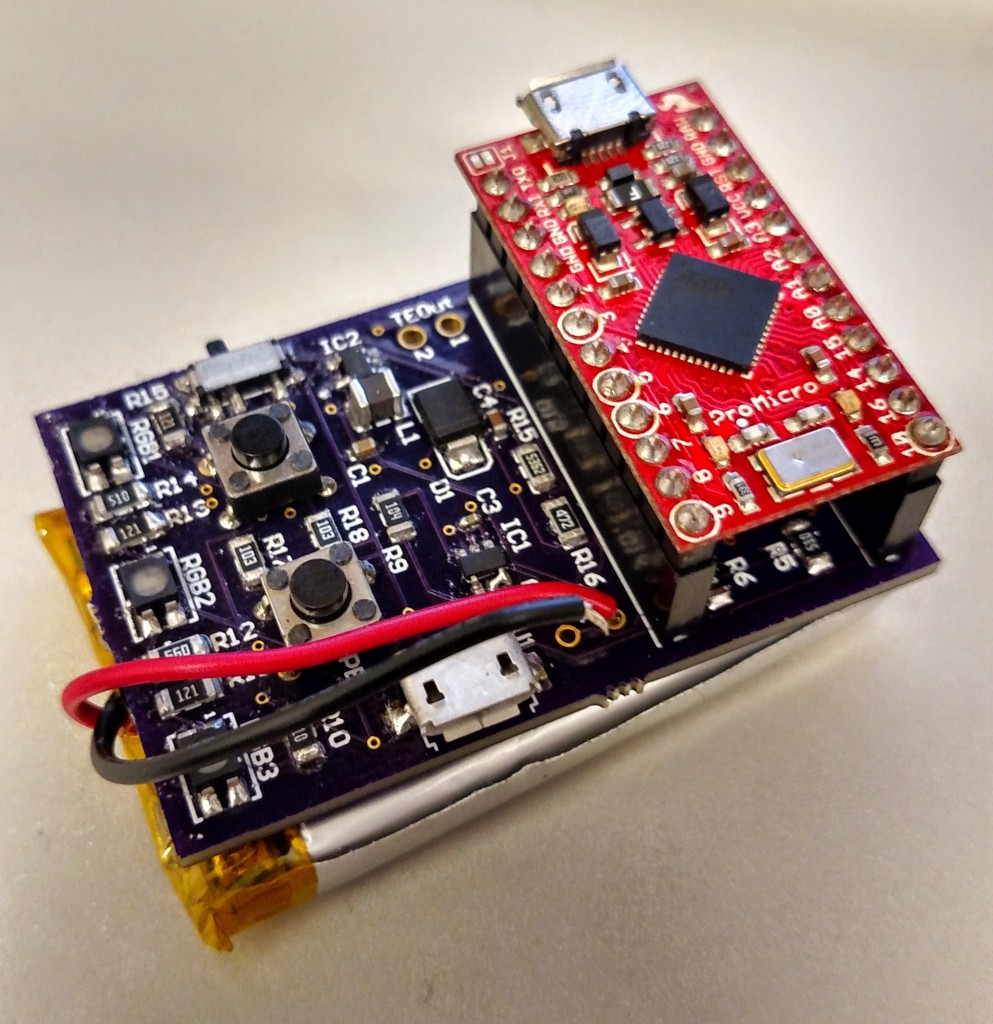
Note: Below are images of the electrical schematic, PCB design, and the current prototype

1_30_2015 Schematic


1_30_2015 PCB2

Week 4

This week:

My meeting with Natalie Rudolph went well and I think we will be able to collaborate in the future.  However, the work we were talking about would be for next year, due to timeline restrictions.  I’ll be continuing to meet with her through the rest of the semester and I’m hopeful that we’ll be able to produce some work for my 3rd year MFA show.

I was extremely fortunate to receive a significant grant that will almost completely fund this semester’s show.  While this is incredibly exciting and humbling, I now need to work a couple of items I had written into the grant but had assumed I wouldn’t get funding for back into the project.  Most significantly, I now have the budget to create a video to support the gallery display of my work.  This will allow me to show the garments on moving bodies, in addition to the more static, interactive display.  I’m in the process of finding a videographer in order to determine a reasonable time frame fro video production.  Then I can readjust my calendar in order to make sure I have the garments completed in time.

On the production front, I wired up a sample of the conductive sensing technology using the copper taffeta.  I was able to get usable readings, but not quite the range I’m looking for.  I think adding more resistors to the system should resolve this easily.  I ordered some material swatches and have finalized my list of garments for the most part.  I’m currently working on sketches as I move into patterning.

Next week:

After picking up some supplies my plan for the upcoming week is to finalize the capacitive sensing technology, mock up the extendable hood mechanics for one of my garments (a hooded sweater) and, once that is complete, drape the fabric to accommodate that framework.  This will allow me to purchase the yarn by the end of the week and start knitting early the following week.

Horsing around

Last week I met with my videographer Aaron Granat, to talk about different uses of video since the original idea of projecting on all four walls of the gallery space was found to be impossible after my meeting in the gallery with Shuxing and Kevin.
My thinking now is to do two rear projected screens at the front and back of the space and create three short videos that will run on a loop. This of course is assuming I can find two short-throw projectors to use for the duration of the show.
I’m going to attempt the original idea of horses running around with just two screens.
The second video will be a “runway show” through the barn. So the models will walk through the door toward the camera, and then exit the other side. One screen will be the front the other will be the back.The third will be a campaign video shot on the grounds in the style of this video: http://www.zara.com/us/en/campaign/man-c566147.html           I’ve been knitting the first of two sweaters in Spring Green with Dennis at Alfred’s Art to Wear knit shop. It’s been a great experience and I’m making good progress.
This week has been CRAZY BUSY. First, on Monday I went to meet Terri Kinsman at Goodweiler’s Leatherworks in Mineral Point. She is going to be producing the two bags for the collection. After my meeting with her I drove over to Spring Green and continued working on the cream sweater. Tuesday I did my dye samples of the camel hair. They turned out GORGEOUS and I’m excited to get started on the jackets. Yesterday I made an appointment with Shelley Hubbard at Horween Tannery and picked up my two hides…to the tune of more money than I care to think about, but they’re gorgeous. Today I went to several shoe and leather repair places looking for zippers for the bags. Ken Gusner at Monona Shoe Repair, is going to order them for me, so I can get the wholesale price. Those should be in, in a couple weeks. This afternoon I have to spec the bags so I can drop off sketches and measurements and leather to Terri tomorrow, and then I’ll spend the majority of Friday knitting.

2/09/2015 TEB Update

What I accomplished this week

Due to copious amounts of schoolwork and being ill, I did not accomplish as much as initially planned for this week.  I did receive the final components needed from Digikey to complete the process of populating board (SMD slide switch, push buttons, and female sockets for the MCU), which I was able to do without any major issues.

Problems

When soldering the slide switch, I noticed the pad spacing for the switch layout was slightly off.  I was still able to soldering the switch to the board without a problem, but the spacing should be adjusted for the next iteration of the PCB.

There are also small protrusions from the bottom of slide switch that were not accounted for when designing the PCB. For this iteration, I just used a fine Hobby knife to cut these protrusions off the switch, but holes will have to be added to the next PCB design to accommodate these protrusion.

Next Week’s Work

This next week, I would like to test the board to see if it is functioning properly and doesn’t fry any components when you power it uplike the last one did. The main concern addressed with Iteration 1.2 of the PCB was the H-bridge section which is responsible for enabling the voltage to be applied across the thermoelectric cooler in either direction. If it is does work without issue, then the next step will be to start the process of rewriting the code to utilize the hardware interrupts.

Week 3

This week got devoured by meetings, so I don’t have a huge project update.  I had a good meeting with Meg Mitchell in which we discussed my direction and plans for my upcoming qualifier show.  She responded particularly well to this piece:

jcf003The intention of this piece is to use the copper taffeta applique on the pants as a capacitive sensor with enough range to make a textile proximity sensor.  When the sensor is activated, the 3D printed spines would lift via muscle wires.

We discussed some additional applications for this sensing technique and I’ve been sketching ideas.  The plan for this week, now that my supplies have arrived, is to test the capacitive sensing (since the pants are already sewn).  If I can get that working, I might change up my final show garment plans to all use a similar sensing technology.  This would allow me to focus on design completion and responses, rather losing too much time this semester to testing technology.

I have a meeting scheduled on Wednesday with Natalie Rudolph, a professor in the Mechanical Engineering department who works on the 3D printing team.  We’re going to discuss their work and what some possible avenues of collaboration may be.  More to come!